How to import and execute in GXtest a Selenium generated test case
This is a step by step guide of how to record and run a simple test case with Selenium, then how it can be included in a GXtest project and run like any other native test case.
Contents |
How to record a test case in Selenium
As an example we will record a simple test case, consisting in searching in www.yahoo.com.
1. Open Mozilla Firefox
2. Select Selenium IDE in the browser: View/Sidebar/Selenium IDE
3. Select the REC button ![]() in the Selenium IDE panel (if Selenium IDE was already selected in the browser's sidebar before we opened it, then Selenium will be recording since we opened the browser without needing to select REC).
in the Selenium IDE panel (if Selenium IDE was already selected in the browser's sidebar before we opened it, then Selenium will be recording since we opened the browser without needing to select REC).
4. Enter the URL www.yahoo.com in the browser.
5. Type “Abstracta GXtest” in the search box and press Enter.
6. Select the link “Abstracta - Simplificando el Testing - GXtest -” from the displayed results.
7. When the page loads, select the REC button from the Selenium panel to end the recording of the test case.
How to run a test case in Selenium
1. Select the button “Play current Test Case” ![]()
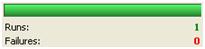
2. Watch the execution and confirm that the result is the desired one.
How to import to GXtest a test case generated using Selenium
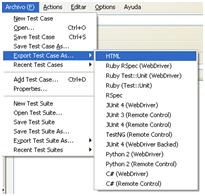
1. Export the Selenium test case in HTML format.

2. In a previously created GXtest project, import a Test Case selecting the test case exported from Selenium.
3. The test case is imported to the project, with the objects, actions and events that were generated in Selenium.


Cómo ejecutar en GXtest nuestro caso de prueba generado con Selenium
1. Debemos instalar Selenium Core:
- Descargar Selenium Core presionando Aqui.
- Una vez se haya descargado, descomprimir el archivo en un directorio. Es aconsejable que el nombre del directorio sea Selenium core X.X (siendo el valor X.X la versión), de esta manera tendremos controlada la versión en todo momento.

- Verificar que ingresando la siguiente URL http://localhost/selenium/core/scripts/xmlextras.js accedemos al javascript.

2. Debemos crear una carpeta virtual que contenga los javascript de Selenium Core para poder ejecutar el caso de prueba. Aquí se detalla el paso a paso pare crear el sitio web virtual.
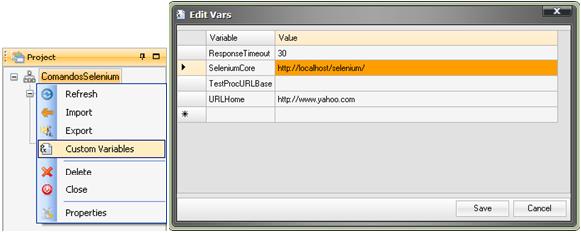
3. Debemos detallarle a GXtest en que directorio se encuentran los javascript de la aplicación a probar. Definimos una variable “SeleniumCorre” con la ruta donde se encuentra instalado Selenium RC con los javascript correspondientes de la aplicación.

4. A la arista Init del caso de prueba importado a GXtest le insertamos el evento GO con el valor de la URL de la aplicación bajo prueba, en nuestro ejemplo www.yahoo.com.
5. Finalmente guardamos los cambios y ejecutamos el caso de prueba en GXtest al igual que lo hacemos con los casos de prueba generados en GXtest.