How to import and execute in GXtest a Selenium generated test case
This is a step by step guide of how to record and run a simple test case with Selenium, then how it can be included in a GXtest project and run like any other native test case.
Contents |
How to record a test case in Selenium
As an example we will record a simple test case, consisting in searching in www.yahoo.com.
1. Open Mozilla Firefox
2. Select Selenium IDE in the browser: View/Sidebar/Selenium IDE
3. Select the REC button ![]() in the Selenium IDE panel (if Selenium IDE was already selected in the browser's sidebar before we opened it, then Selenium will be recording since we opened the browser without needing to select REC).
in the Selenium IDE panel (if Selenium IDE was already selected in the browser's sidebar before we opened it, then Selenium will be recording since we opened the browser without needing to select REC).
4. Enter the URL www.yahoo.com in the browser.
5. Type “Abstracta GXtest” in the search box and press Enter.
6. Select the link “Abstracta - Simplificando el Testing - GXtest -” from the displayed results.
7. When the page loads, select the REC button from the Selenium panel to end the recording of the test case.
How to run a test case in Selenium
1. Select the button “Play current Test Case” ![]()
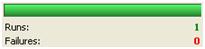
2. Watch the execution and confirm that the result is the desired one.
How to import to GXtest a test case generated using Selenium
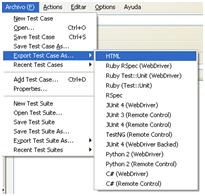
1. Export the Selenium test case in HTML format.

2. In a previously created GXtest project, import a Test Case selecting the test case exported from Selenium.
3. The test case is imported to the project, with the objects, actions and events that were generated in Selenium.


How to run in GXtest a test case generated using Selenium
1. Install Selenium Core:
- To download Selenium Core click Here.
- Once the download has finished, unzip the file into a new directory. It's recomended that the directory's name is Selenium core X.X (being X.X the version number), in order to be aware of the version at all times.

- Check that the javascript is accessible at the following URL: http://localhost/selenium/core/scripts/xmlextras.js

2. In order to run the test case, a virtual folder containing the Selenium Core javascripts must be created. Here are the steps that guide you in creating the virtual web site.
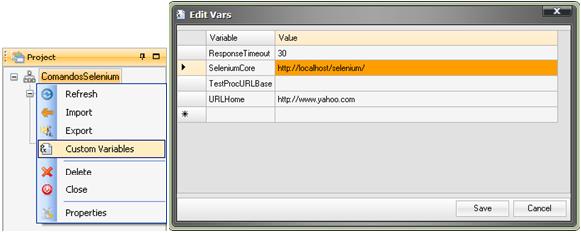
3. We must reference in GXtest in which directory the javascripts can be found. Define a variable named “SeleniumCore” containing the route where Selenium RC is installed.

4. Insert a go event with the URL of the application under test to the initial edge of the imported test case, in the example www.yahoo.com.
5. Finally, save the changes and run the test case in GXtest just like with GXtest generated test cases.