Difference between revisions of "Old GXtest Installation guide"
(→License Activation) |
|||
| Line 34: | Line 34: | ||
* Note: The installation will be done in the C: drive if you want to install on another drive you need to run one by one the MSI attached to installer. The Manager is installed in the directory of the Internet Information Server. | * Note: The installation will be done in the C: drive if you want to install on another drive you need to run one by one the MSI attached to installer. The Manager is installed in the directory of the Internet Information Server. | ||
| + | |||
| + | |||
| + | == GXtest Manager Installation == | ||
| + | If you selected to start installing GXtest Manager will run a simple wizard for installation. | ||
| + | |||
| + | # First, the installer displays the welcome. Press "Next". <br><br>[[image:GXTMInstalador_2.png]]<br><br> | ||
| + | # Then the installer let you choose the virtual directory where the web application is going to be installed. If the installation is being done in Windows Vista, Windows 7, you may also specify the Application Pool desired. In this combo select the "Classic. NET AppPool" and then click "Next". | ||
| + | # Pressing the "Next" button will display the product license. It is important to read it before accepting it. Should agree with the terms, select "I Agree" then "Next" button. Check again after the installation by pressing "Next". | ||
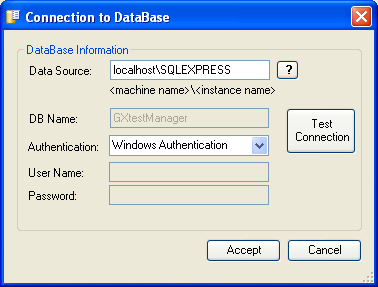
| + | # It displays a progress bar and then the following window will be displayed, where you must enter the SQLServer instance to be used by GXtest Manager: <br><br>[[image:GXTMInstalador_4.png]]<br><br> | ||
| + | # This window lets you configure the connection to the database. Be sure you have SQLServer installed before continuing. Basically, you have to enter data base Instance (computer name, the "\" char and the name of the database instance). By default, the instance name of the SQL Server Express version is "SQLEXPRESS". | ||
| + | # Then click "Accept". The system asks if you want to create the schema of the database. If this is not your first installation, the program will warn you that it has found a database (indicating the version) and it asks you what to do. <br>[[runmigration.png|center]]<br>The options are: | ||
| + | #* To migrate ( "Run Migration") maintaining the current data base (this is the recommended option if your database has a previous version). | ||
| + | #* Override base ( "Overwrite database"), deleting the current data. | ||
| + | #* Take no action on the database ( "Do nothing"). <br>The installer will do this check first for GXtest Database Manager, and then to test the repository GXtest Designer. | ||
| + | # You have successfully installed GXtest Manager on your system. | ||
| + | |||
| + | After installing the Manager is required or rebooting the machine, or start manually GXtest Daemon service. Then every time you start the machine running this service will start automatically. In order to work properly, you must have entered the license, so you should restart the machine after enabling license. | ||
Revision as of 18:15, 6 March 2010
The various components to install are listed below:
- GXtest Designer and GXtest Recorder to create and edit Test Cases
- GXtest Manager (GXtest Daemon and GXtest Executors included) to schedule the tests to execute
- GXtest Extension, useful to export the GeneXus KB (X, Ev1 or upper)
GXtest Designer has to be installed on machines where users want to model the test cases. It is a single-user component that connects to its own database and then the Manager database, so it must be on the same LAN.
Additionally, where installing a GXtest Designer you need to install GXtest Recorder to record test cases from Internet Explorer.
The component GXtest Recorder can be installed without the GXtest Designer, in order to record test cases and save them as compressed XML files that can be sent after to the user who is using GXtest Designer, to import and use them in any project.
The GXtest Manager is installed as Web application in a .NET environment. It can be remotely accessed by different users. At the same server (not necessarily) GXtest Daemon component must be running, which checks if there are scheduled tasks ready to execute, and makes them execute in the indicated machine (in the GXtest Executor component).
So there can be several GXtest Executor where tests are run effectively. They must also have access to the GXtest Manager database. Because they are the ones who run the test cases, they must also have access to the application under test.
Contents |
Prerequisites
You must have SQLServer 2005/2008. If you don't have SQLServer 2005/2008 installed you can find a version (Express) for free download here.
GXtest works on Windows XP® (SP2), Windows Vista® and Windows 7® operating systems, with Internet Explorer® version 6, 7 and 8. No special hardware requirements are defined to run this applicative.
It is also necessary for the execution of GXtest Manager the IIS web server - Internet Information Services, which is packaged as a Windows component.
Installation (step by step)
GXtest has an installer which shows the various components to install. You must first select what you want to install and then each component is configured via a Wizard.

Typical installation: you might have a PC (or server) to install a GXtest Manager and with one GXtest Executor to run unattended tests there, and in a Tester's PC would be installed GXtest Designer and Recorder.
Then, in the server PC, you would select only GXtest Manager and Executor in the GXtest installer. Then in the Tester's PC you would run the same GXtest installer selecting only GXtest Designer and Recorder components.
We recommend first installing the server side and then the "clients" or testers. In turn, consider GXtest Designer can work "offline" of GXtest Manager, working in a local database. It is recommended for simplicity to work from the different GXtest Designer installed on the same GXtest Manager database.
- Note: The installation will be done in the C: drive if you want to install on another drive you need to run one by one the MSI attached to installer. The Manager is installed in the directory of the Internet Information Server.
GXtest Manager Installation
If you selected to start installing GXtest Manager will run a simple wizard for installation.
- First, the installer displays the welcome. Press "Next".
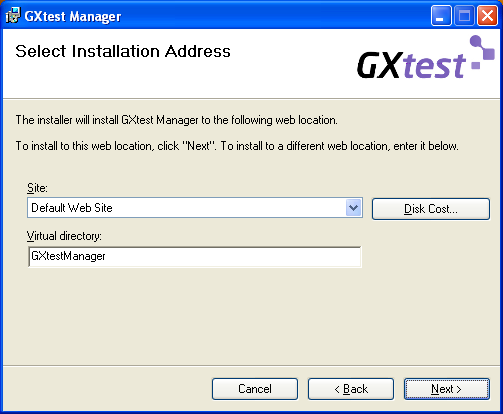
- Then the installer let you choose the virtual directory where the web application is going to be installed. If the installation is being done in Windows Vista, Windows 7, you may also specify the Application Pool desired. In this combo select the "Classic. NET AppPool" and then click "Next".
- Pressing the "Next" button will display the product license. It is important to read it before accepting it. Should agree with the terms, select "I Agree" then "Next" button. Check again after the installation by pressing "Next".
- It displays a progress bar and then the following window will be displayed, where you must enter the SQLServer instance to be used by GXtest Manager:
- This window lets you configure the connection to the database. Be sure you have SQLServer installed before continuing. Basically, you have to enter data base Instance (computer name, the "\" char and the name of the database instance). By default, the instance name of the SQL Server Express version is "SQLEXPRESS".
- Then click "Accept". The system asks if you want to create the schema of the database. If this is not your first installation, the program will warn you that it has found a database (indicating the version) and it asks you what to do.
center
The options are:- To migrate ( "Run Migration") maintaining the current data base (this is the recommended option if your database has a previous version).
- Override base ( "Overwrite database"), deleting the current data.
- Take no action on the database ( "Do nothing").
The installer will do this check first for GXtest Database Manager, and then to test the repository GXtest Designer.
- You have successfully installed GXtest Manager on your system.


After installing the Manager is required or rebooting the machine, or start manually GXtest Daemon service. Then every time you start the machine running this service will start automatically. In order to work properly, you must have entered the license, so you should restart the machine after enabling license.
License Activation
GXtest uses the same mechanism that GeneXus for licensing through the License Manager GXtest included in the installation folder. To activate the product once installed is necessary to request a license.
Also, a trial license may be requested by: Authorize -> Request License -> Authorize Online.
For more information visit http://wiki.gxtechnical.com/commwiki/servlet/hwiki?GeneXus+X+Protection+Manual
The Executor and Recorder components can be installed on different machines without any problem.