Difference between revisions of "GXtest プロジェクト"
(→3. GXtest プロジェクト) |
|||
| (6 intermediate revisions by 2 users not shown) | |||
| Line 6: | Line 6: | ||
[[category:GXtest Guides]] | [[category:GXtest Guides]] | ||
| − | |||
| − | + | [[ログイン / 接続|<- 前へ]] | [[GXtest Designer ユーザーズマニュアル|インデックス]] | [[GXtest および GeneXus KB|次へ-> ]] | |
| − | + | == 3. GXtest プロジェクト == | |
| − | * | + | |
| − | * | + | GXtest を使って行うはじめての手順は、プロジェクトの作成です。プロジェクトを作成するには、[プロジェクト] > [新規プロジェクト] の順に選択します。新しいウィンドウでプロジェクトのプロパティを指定することができます: |
| − | * | + | * プロジェクトの名前 |
| − | * | + | * プロジェクトに関連付けられている KB ([[GXtest_および_GeneXus_KB | GeneXus KB をインポートする]]方法も参照してください) |
| + | * 既定のブラウザー | ||
| + | * 既定の URL | ||
[[image:createNewProject.jpg|center]] | [[image:createNewProject.jpg|center]] | ||
| − | + | 入力した名前によってプロジェクトが識別されます。 | |
| − | * | + | KB (ナレッジベース- GeneXus ソースコード) はテストされるアプリケーションです。複数のアプリケーションが生成される場合、複数の KB を選択することができます。たとえば GXportal や GXflow を使用したアプリケーションなど。GXtest にインポートされた KB は 1 つのプロジェクトでのみ使用することができ、共有することはできません。 |
| − | * | + | 使用しているブラウザーが既定のブラウザーです (このバージョンでは、Internet Explorer を使用することができます)。 |
| + | 既定の URL には次の 2 つの機能があります: | ||
| + | * まず、テストケースの記録を開始するときに既定の URL を使用すると、ブラウザーがこの URL を提示するようになります。 | ||
| + | * 次に、テストケースが urlHome 変数 (GXtest Manager で実行されるタスクで使用される) を使用する場合、既定の URL はこの変数を使用します。GXtest Manager 内のこの設定について詳しくは、[[GXtest_Manager_ユーザーズマニュアル#.E7.92.B0.E5.A2.83 | GXtest Manager ユーザーズマニュアル]]を参照してください。 | ||
| + | |||
| + | |||
| + | [プロジェクト] > [プロジェクトを開く] の順に選択してプロジェクトを開くことができます。 | ||
| + | 開いているプロジェクトを削除する場合、右側のプロジェクトツリーから任意のプロジェクトをクリックし、[削除] を選択します。これは、プロジェクトに関連付けられている KB を削除するのではないことを覚えておいてください。 | ||
| − | |||
| − | |||
| − | |||
| − | |||
| − | |||
| − | |||
| − | |||
| − | |||
| + | === プロジェクトのエクスポートとインポート === | ||
| + | GXtest では、プロジェクトのすべてのテストケースとそのデータプールをエクスポートすることができます。必要に応じてプロジェクトを複製することができます。 エクスポートでは、プロジェクトに関連する KB はエクスポートされないということを覚えておくことが重要です。 | ||
| + | プロジェクトを複製するには、プロジェクトをエクスポートしてから、次の手順に従ってそれをインポートする必要があります: | ||
| + | # [プロジェクト] > [インポートとエクスポート] > [プロジェクトをエクスポート] の順に選択して、プロジェクトをエクスポートします。ここではエクスポートするプロジェクトを選択し、エクスポートするプロジェクトに含まれているファイルもエクスポートすることができます。GXtest はエクスポートされたテストケースとデータプールを表示する新しいウィンドウを開きます。 | ||
| + | # 新規プロジェクトを作成します:プロジェクトを作成し、手順 1 でエクスポートしたプロジェクトとしてそれを同じ KB に関連づけます。 | ||
| + | # [プロジェクト] > [インポートとエクスポート] > [プロジェクトをインポート] の順に選択してから、手順 2 で作成したプロジェクトを選択します。次に、手順 1 でエクスポートされたプロジェクト内のデータを含む ZIP ファイルを選択するよう GXtest に求められます。完了したら、GXtest はインポート結果を表示します。 | ||
---- | ---- | ||
| − | [[ログイン / 接続|<- | + | [[ログイン / 接続|<- 前へ]] | [[GXtest および GeneXus KB|次へ-> ]] |
| − | + | [[GXtest Designer ユーザーズマニュアル]]に戻る | |
Latest revision as of 05:36, 22 May 2015
3. GXtest プロジェクト
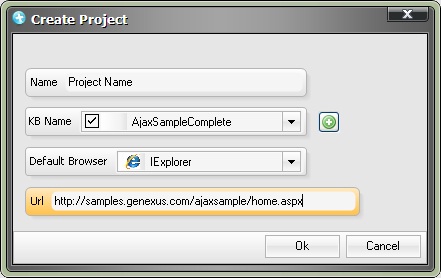
GXtest を使って行うはじめての手順は、プロジェクトの作成です。プロジェクトを作成するには、[プロジェクト] > [新規プロジェクト] の順に選択します。新しいウィンドウでプロジェクトのプロパティを指定することができます:
- プロジェクトの名前
- プロジェクトに関連付けられている KB ( GeneXus KB をインポートする方法も参照してください)
- 既定のブラウザー
- 既定の URL
入力した名前によってプロジェクトが識別されます。 KB (ナレッジベース- GeneXus ソースコード) はテストされるアプリケーションです。複数のアプリケーションが生成される場合、複数の KB を選択することができます。たとえば GXportal や GXflow を使用したアプリケーションなど。GXtest にインポートされた KB は 1 つのプロジェクトでのみ使用することができ、共有することはできません。 使用しているブラウザーが既定のブラウザーです (このバージョンでは、Internet Explorer を使用することができます)。 既定の URL には次の 2 つの機能があります:
- まず、テストケースの記録を開始するときに既定の URL を使用すると、ブラウザーがこの URL を提示するようになります。
- 次に、テストケースが urlHome 変数 (GXtest Manager で実行されるタスクで使用される) を使用する場合、既定の URL はこの変数を使用します。GXtest Manager 内のこの設定について詳しくは、 GXtest Manager ユーザーズマニュアルを参照してください。
[プロジェクト] > [プロジェクトを開く] の順に選択してプロジェクトを開くことができます。
開いているプロジェクトを削除する場合、右側のプロジェクトツリーから任意のプロジェクトをクリックし、[削除] を選択します。これは、プロジェクトに関連付けられている KB を削除するのではないことを覚えておいてください。
プロジェクトのエクスポートとインポート
GXtest では、プロジェクトのすべてのテストケースとそのデータプールをエクスポートすることができます。必要に応じてプロジェクトを複製することができます。 エクスポートでは、プロジェクトに関連する KB はエクスポートされないということを覚えておくことが重要です。 プロジェクトを複製するには、プロジェクトをエクスポートしてから、次の手順に従ってそれをインポートする必要があります:
- [プロジェクト] > [インポートとエクスポート] > [プロジェクトをエクスポート] の順に選択して、プロジェクトをエクスポートします。ここではエクスポートするプロジェクトを選択し、エクスポートするプロジェクトに含まれているファイルもエクスポートすることができます。GXtest はエクスポートされたテストケースとデータプールを表示する新しいウィンドウを開きます。
- 新規プロジェクトを作成します:プロジェクトを作成し、手順 1 でエクスポートしたプロジェクトとしてそれを同じ KB に関連づけます。
- [プロジェクト] > [インポートとエクスポート] > [プロジェクトをインポート] の順に選択してから、手順 2 で作成したプロジェクトを選択します。次に、手順 1 でエクスポートされたプロジェクト内のデータを含む ZIP ファイルを選択するよう GXtest に求められます。完了したら、GXtest はインポート結果を表示します。
