Difference between revisions of "Creating a test case for Smart Devices"
(→Create a new test case for Smart Devices) |
(→Create a new test case for Smart Devices) |
||
| Line 18: | Line 18: | ||
| − | + | To start creating the new test case, we go to the menu Test cases -> New. | |
[[File:CreateNewSDTC.PNG|center]] | [[File:CreateNewSDTC.PNG|center]] | ||
| − | + | At the time we need to choose a name, we also need to specify the main platform of the test case. In our case, we will choose 'Smart Device' | |
| − | |||
| − | + | Now that we have a new empty test case, we will drag and drop a new SDPage from the Objects toolbar. This SDPage will represent the first screen the application shows when we start the execution, and it will match with the GeneXus object called Menu. Once we have the SDPage in the test case, we double-click the SDPage an we choose the Menu object from the object selector window. | |
| + | |||
| + | |||
| + | After that, we must connect the start node to the Menu SDPage, so we drag the edge arrow to accomplish this. To make the application execute, we must add a Go command, as we do with the Web test cases to open the browser on a new URL. On a Smart Device test case, the Go command will install/launch the application in our device o emulator. So, we add a Go command on the first edge, and as the value parameter we must put the path to the APK file of the Android app in our computer. Luckily, we already loaded this path in the &apkPath variable in the [[Requirements_for_executing_in_Android]]. | ||
[[File:GoApkPath.png | center]] | [[File:GoApkPath.png | center]] | ||
| − | + | At this ponint, we can execute the test case as it is, in order to check that the app launches on the selected emulator/device. | |
| − | + | Now we can continue with the test case design. We should add a new command TapText in the Menu SDPage, which taps on the "Work With Devices Company" item of the menu (so we will have a TapText("Work With Devices Company")). This tap should take us to the CompanyList page, so we must add another SDPage associated with the CompanyList GeneXus object, and connect the Menu SDPage to the latter one through a new edge. | |
| − | + | Once in the CompanyList page, we must tap on the Insert button to go and create a new company, so we will add a new Tap command over this button, on the SDPage associated with CompanyList. The command should look like this: Tap(CompanyList.ButtonInsert) | |
| − | + | After that, we will create a new SDPage, corresponding with the screen that allow us to create/edit/update a company. This page will be the CompanyGeneralSection GeneXus object, so we must assign this object to the SDPage, and connect the CompanyList node to this one. | |
| − | + | Finally, at the last SDPage (CompanyGeneralSection), we will write the name for the new company (for example "My Company"), and then press the "Save" button. | |
[[File:TCAddCompany.png | center]] | [[File:TCAddCompany.png | center]] | ||
| − | + | In order to automate those two last steps, we will add the commands in the CompanyGeneralSection SDPage: | |
* FillInput(CompanyGeneralSection.CompanyName, "My Company") | * FillInput(CompanyGeneralSection.CompanyName, "My Company") | ||
* Tap(CompanyGeneralSection.ButtonSave) | * Tap(CompanyGeneralSection.ButtonSave) | ||
| − | + | At this point we completed the steps to create the the new company, but it would be nice to verify on the same test case that the company has been successfully registered. So we will add one last SDPage associated to the CompanyList object, which is the page where we get after saving the new company. In this last page, we will add a validation that checks that the new company ("My Company") appears in the list. This is done with the AppearText("My Company") command. | |
| Line 57: | Line 59: | ||
| − | + | Run the test case and check that all steps are successfully completed, including the last validation. | |
| + | |||
| + | |||
| + | Now that we have our first test case, we can change the fixed values we used in the test case flow and use [[Using Datapools | datapools]] instead. This makes our test cases easier to maintain and extend with new data. | ||
== Extender el caso de prueba a la Web == | == Extender el caso de prueba a la Web == | ||
Revision as of 20:33, 16 April 2015
For creating our first GXtest test case for Smart Devices, we will use the GeneXus sample Android application My first Android Application. This sample application, is a very simple app that stores Customer and Companies information.
We will create a new test case that adds a new company, and then verifies that the company was actually added to the app data.
Pre-requisites
First of all, we will need to generate the Android application that will be tested, so we need to complete the previous mentioned GeneXus tutorial.
After that, be sure to have fulfilled the Requirements for executing in Android, for an emulator or a real device.
Also, we assume that you already done the creation of a GXtest project and the setup the KB for the project. For additional info, see GXtest Projects and GXtest and the GeneXus KB articles.
Create a new test case for Smart Devices
Before we start designing the test case, it is recommended we manually follow the steps to create a new company in the mobile app, so we get to know the process and the steps we will automate later with GXtest. To run the app in the emulator/device from GXtest Designer, we can click in the "Launch application in device" button located in the toolbar, and also in the Smart Devices menu. In order to add a new company, from the main app menu we select the option "Work With Devices Company", tap in the button Insert, fill a company name and tap on Save. That will take us back to the company list, where we should see the company we just created.
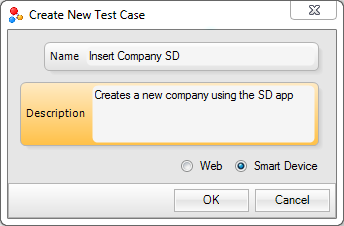
To start creating the new test case, we go to the menu Test cases -> New.
At the time we need to choose a name, we also need to specify the main platform of the test case. In our case, we will choose 'Smart Device'
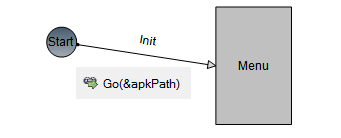
Now that we have a new empty test case, we will drag and drop a new SDPage from the Objects toolbar. This SDPage will represent the first screen the application shows when we start the execution, and it will match with the GeneXus object called Menu. Once we have the SDPage in the test case, we double-click the SDPage an we choose the Menu object from the object selector window.
After that, we must connect the start node to the Menu SDPage, so we drag the edge arrow to accomplish this. To make the application execute, we must add a Go command, as we do with the Web test cases to open the browser on a new URL. On a Smart Device test case, the Go command will install/launch the application in our device o emulator. So, we add a Go command on the first edge, and as the value parameter we must put the path to the APK file of the Android app in our computer. Luckily, we already loaded this path in the &apkPath variable in the Requirements_for_executing_in_Android.
At this ponint, we can execute the test case as it is, in order to check that the app launches on the selected emulator/device.
Now we can continue with the test case design. We should add a new command TapText in the Menu SDPage, which taps on the "Work With Devices Company" item of the menu (so we will have a TapText("Work With Devices Company")). This tap should take us to the CompanyList page, so we must add another SDPage associated with the CompanyList GeneXus object, and connect the Menu SDPage to the latter one through a new edge.
Once in the CompanyList page, we must tap on the Insert button to go and create a new company, so we will add a new Tap command over this button, on the SDPage associated with CompanyList. The command should look like this: Tap(CompanyList.ButtonInsert)
After that, we will create a new SDPage, corresponding with the screen that allow us to create/edit/update a company. This page will be the CompanyGeneralSection GeneXus object, so we must assign this object to the SDPage, and connect the CompanyList node to this one.
Finally, at the last SDPage (CompanyGeneralSection), we will write the name for the new company (for example "My Company"), and then press the "Save" button.
In order to automate those two last steps, we will add the commands in the CompanyGeneralSection SDPage:
- FillInput(CompanyGeneralSection.CompanyName, "My Company")
- Tap(CompanyGeneralSection.ButtonSave)
At this point we completed the steps to create the the new company, but it would be nice to verify on the same test case that the company has been successfully registered. So we will add one last SDPage associated to the CompanyList object, which is the page where we get after saving the new company. In this last page, we will add a validation that checks that the new company ("My Company") appears in the list. This is done with the AppearText("My Company") command.
Run the test case and check that all steps are successfully completed, including the last validation.
Now that we have our first test case, we can change the fixed values we used in the test case flow and use datapools instead. This makes our test cases easier to maintain and extend with new data.
Extender el caso de prueba a la Web
Es posible crear un caso de prueba "híbrido", es decir, que ejecute una parte de la prueba sobre el dispositivo, y otra parte de la prueba sobre la web. Por ejemplo, luego de crear la empresa desde el dispositivo, me gustaría poder buscar la nueva empresa en la web de mi aplicación y validar que también aparece allí.
Para esto, simplemente debemos incluir los casos de prueba que realizan estas tareas. Por ejemplo, si ya tenemos un caso de prueba "Search Company Web" que busque la empresa "My Company", es posible incluir ambos casos de prueba de esta forma y lograr lo que queremos:


