Difference between revisions of "Creating a Test Case with Bifurcation"
| (8 intermediate revisions by 4 users not shown) | |||
| Line 1: | Line 1: | ||
| + | {{Idiomas|Crear un Caso de Prueba con Bifurcación| Creating a Test Case with Bifurcation|分岐を使用するテストケースの作成}} | ||
[[category:GXtest Guides]] | [[category:GXtest Guides]] | ||
There are times when it is necessary to perform actions according to the state of an application or the response generated by it. For these scenarios you can use the Decision constructor. | There are times when it is necessary to perform actions according to the state of an application or the response generated by it. For these scenarios you can use the Decision constructor. | ||
| − | In this case you will create the Test Case called | + | In this case you will create the Test Case called ViewClientWithCondition. This Test Case consists of entering Clients and looking for a specific client. If the client is Abstracta it will be viewed but if it is not you will go to the modification page. |
In order to make this kind of Test Case you need to first follow the steps described in Creating a Test Case with Data Pools and the the Test Case should be called SeeClientWithCondition. | In order to make this kind of Test Case you need to first follow the steps described in Creating a Test Case with Data Pools and the the Test Case should be called SeeClientWithCondition. | ||
Then drag from the Objects panel the Decision constructor. After that drag a Page element to the diagram. The Test Case ought to look like the following: | Then drag from the Objects panel the Decision constructor. After that drag a Page element to the diagram. The Test Case ought to look like the following: | ||
| + | [[Image:Decision.jpg |center]] | ||
| − | + | Then connect the False edge line to the added page on the diagram and edit the properties of the page making the name (Update Client), the KB (GX9 - AjaxSample) and the GeneXus object (transaction, Client). | |
| − | + | ||
| − | + | [[Image:editPageProperties.jpg|center]] | |
| − | + | Then create a new edge line that connects the Work With Clients Page with the Decision object. To do so drag one Edge Line from the objects panel and connect it to the edges of previously mentioned nodes. To this Edge Line you need to add a DummyEvent so you can move from the last Page to the Decision without performing an action. The model ought to look like the following: | |
| − | [[ | + | [[Image:EdgeWithDummyEvent.jpg|center]] |
| − | + | Then you need to tell it to perform a validation by right clicking on the condition and then clicking Add Condition. | |
| − | [[ | + | [[Image:AddCommandMenuInDecision.jpg|center]] |
| − | + | In this case you will add an AppearText validation using Abstracta as the value to be checked for. Then double click on the command to enter a name. In this case you will put "Is it Abstracta?" referring to whether or not the client is Abstracta. | |
| − | + | ||
| − | + | Now you need to assign to the actions to be taken if the client is Abstracta (Edge Line True) or if they are not (Edge Line False). If the client is Abstracta, the Edge Line ought to have the same commands as the ClickTable Edge Line that goes from the Work With Clients Page to View Client, so that if the client is Abstracta you can view their data. To take advantage of the commands that were generated when recording the Test Case you can Drag & Drop between the ClickTable Edge Line and the True Edge Line of the Decision. Then you just delete the Click Table Edge Line and join the True Edge Line with the View Client Page. | |
| − | + | [[Image:EdgeTrue.jpg|center]] | |
| − | + | Now you just have to model the False Edge Line, the Test Case with a condition will be ready. First you need to add to the Edge Line a command that says click the Update Button in the client grid. To do so, right click on the Edge Line and then click Add Command. This will bring up a window where you can add the command. Add an Event command and then choose the ClickTable command. | |
| − | + | Once this is done you have to fill in the command's parameters. In the Table parameter enter AjaxSample as the KB, WWClient as the object and Grid1 as the control. | |
| − | + | For the SelectionRule parameter select ByRow as the type of comparision (this is the default choice) and then type 1 in the Value field. | |
| − | + | Now you just need to enter the name of the column in the last parameter. You will put AjaxSample as the KB, WWClient as the object | |
| + | and Update as the control. | ||
| − | + | The command should then look like this: | |
| − | + | ||
| − | + | ||
| − | + | ||
| − | + | ||
| − | + | ||
[[Image:EventCLT.jpg|center]] | [[Image:EventCLT.jpg|center]] | ||
| − | + | The Test Case is now finished and you only need to test it. Run it three times by pressing (Shift+F7) and watch closely. Notice that you are able to view the Abstracta client while the Artech and Artech client goes to the modifcation page. | |
| − | + | ||
| − | == | + | == See also == |
| − | * [[ | + | * [[Creating an Embedded Test Case]] |
| − | * [[ | + | * [[Creating a Test Case with Variables]] |
Latest revision as of 20:09, 20 February 2014
There are times when it is necessary to perform actions according to the state of an application or the response generated by it. For these scenarios you can use the Decision constructor.
In this case you will create the Test Case called ViewClientWithCondition. This Test Case consists of entering Clients and looking for a specific client. If the client is Abstracta it will be viewed but if it is not you will go to the modification page. In order to make this kind of Test Case you need to first follow the steps described in Creating a Test Case with Data Pools and the the Test Case should be called SeeClientWithCondition.
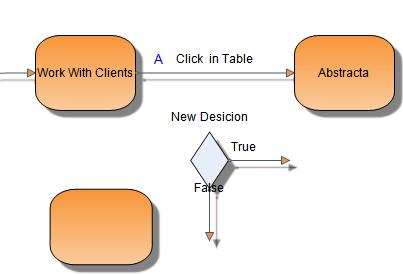
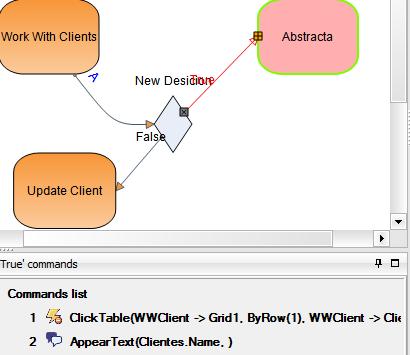
Then drag from the Objects panel the Decision constructor. After that drag a Page element to the diagram. The Test Case ought to look like the following:
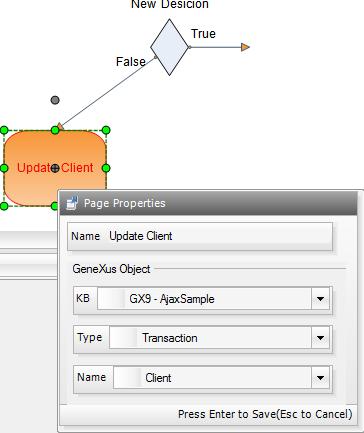
Then connect the False edge line to the added page on the diagram and edit the properties of the page making the name (Update Client), the KB (GX9 - AjaxSample) and the GeneXus object (transaction, Client).
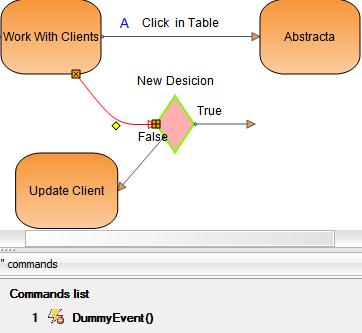
Then create a new edge line that connects the Work With Clients Page with the Decision object. To do so drag one Edge Line from the objects panel and connect it to the edges of previously mentioned nodes. To this Edge Line you need to add a DummyEvent so you can move from the last Page to the Decision without performing an action. The model ought to look like the following:
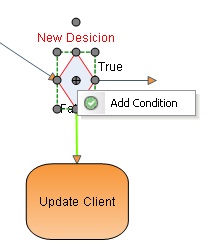
Then you need to tell it to perform a validation by right clicking on the condition and then clicking Add Condition.
In this case you will add an AppearText validation using Abstracta as the value to be checked for. Then double click on the command to enter a name. In this case you will put "Is it Abstracta?" referring to whether or not the client is Abstracta.
Now you need to assign to the actions to be taken if the client is Abstracta (Edge Line True) or if they are not (Edge Line False). If the client is Abstracta, the Edge Line ought to have the same commands as the ClickTable Edge Line that goes from the Work With Clients Page to View Client, so that if the client is Abstracta you can view their data. To take advantage of the commands that were generated when recording the Test Case you can Drag & Drop between the ClickTable Edge Line and the True Edge Line of the Decision. Then you just delete the Click Table Edge Line and join the True Edge Line with the View Client Page.
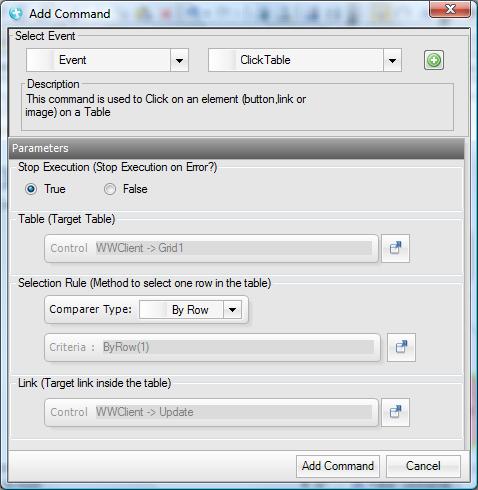
Now you just have to model the False Edge Line, the Test Case with a condition will be ready. First you need to add to the Edge Line a command that says click the Update Button in the client grid. To do so, right click on the Edge Line and then click Add Command. This will bring up a window where you can add the command. Add an Event command and then choose the ClickTable command.
Once this is done you have to fill in the command's parameters. In the Table parameter enter AjaxSample as the KB, WWClient as the object and Grid1 as the control.
For the SelectionRule parameter select ByRow as the type of comparision (this is the default choice) and then type 1 in the Value field.
Now you just need to enter the name of the column in the last parameter. You will put AjaxSample as the KB, WWClient as the object and Update as the control.
The command should then look like this:
The Test Case is now finished and you only need to test it. Run it three times by pressing (Shift+F7) and watch closely. Notice that you are able to view the Abstracta client while the Artech and Artech client goes to the modifcation page.
