Difference between revisions of "Basic Configurations in GXtest Manager"
(Página nueva: category:GXtest Guides == General Configurations == On the menu '''Configurations''', the option '''General Configurations''' serves to specify certain general settings of GXtest...) |
|||
| (8 intermediate revisions by 4 users not shown) | |||
| Line 1: | Line 1: | ||
| + | {{Idiomas| Primeras Configuraciones en GXtest Manager| Basic Configurations in GXtest Manager|GXtest Manager の基本構成}} | ||
[[category:GXtest Guides]] | [[category:GXtest Guides]] | ||
== General Configurations == | == General Configurations == | ||
| − | + | The menu '''Configurations/Options''' is useful to specify certain general settings of GXtest Manager. Entering this option, we indicate: | |
| − | * SMTP server data (host, port, username and password) to which notifications will be sent by email. | + | * SMTP server data (host, port, username and password) to which notifications will be sent by email. For example: |
| − | * | + | ** SMTP Host: mail.domain.com |
| + | ** SMTP Port: 25 | ||
| + | ** SMTP User: gxtestMailUser@domain.com | ||
| + | ** SMTP Password: ******* | ||
* The URL where the Manager must notify the end of executions. It is suggested not to modify this value, except for changing the default virtual directory where the Web application is installed. | * The URL where the Manager must notify the end of executions. It is suggested not to modify this value, except for changing the default virtual directory where the Web application is installed. | ||
| + | * If you want to save a log or not. It's suggested to use the value "NO" except for debugging proposes. | ||
| + | * The path where the application will write your Log. | ||
| − | + | == Environment == | |
| + | This option is in the Configurations menu and enables us to specify properties about the different applications on which we run the test cases. These environments are used when creating a Task to tell GXtest Manager on what type of application will run the test. | ||
| − | + | To the example we will create one containing the same URL that we used to automate the test cases, so that in this way the tests will run on the same system. Then select the rest of the information as suggested in the image: | |
| − | + | <br><br> | |
| + | [[image:newAppSetting.png | center]]<br><br> | ||
| − | + | == Other settings == | |
| + | Looking at the rest of the menu "Configurations" you will see that the installation of GXtest Manager creates certain default values to be used, for example various Browsers, Operating System, DBMS, and even GXtest Executors. So in this tutorial are not going to create these items as we considere that we will use the predefined ones. | ||
| − | == | + | == See Also == |
| − | + | [[GXtest Manager Tutorial]] | |
| − | + | ||
| − | + | ||
| − | + | ||
| − | + | ||
Latest revision as of 16:08, 20 February 2014
Contents |
General Configurations
The menu Configurations/Options is useful to specify certain general settings of GXtest Manager. Entering this option, we indicate:
- SMTP server data (host, port, username and password) to which notifications will be sent by email. For example:
- SMTP Host: mail.domain.com
- SMTP Port: 25
- SMTP User: gxtestMailUser@domain.com
- SMTP Password: *******
- The URL where the Manager must notify the end of executions. It is suggested not to modify this value, except for changing the default virtual directory where the Web application is installed.
- If you want to save a log or not. It's suggested to use the value "NO" except for debugging proposes.
- The path where the application will write your Log.
Environment
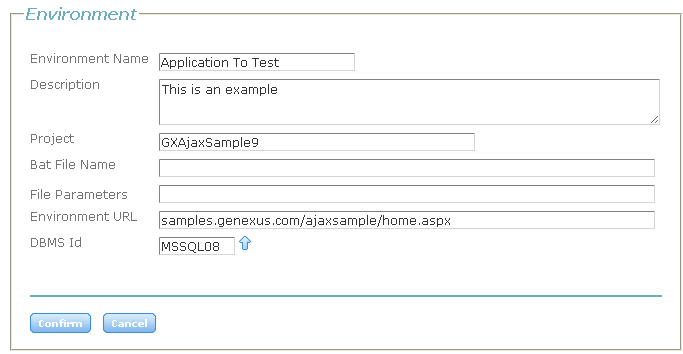
This option is in the Configurations menu and enables us to specify properties about the different applications on which we run the test cases. These environments are used when creating a Task to tell GXtest Manager on what type of application will run the test.
To the example we will create one containing the same URL that we used to automate the test cases, so that in this way the tests will run on the same system. Then select the rest of the information as suggested in the image:
Other settings
Looking at the rest of the menu "Configurations" you will see that the installation of GXtest Manager creates certain default values to be used, for example various Browsers, Operating System, DBMS, and even GXtest Executors. So in this tutorial are not going to create these items as we considere that we will use the predefined ones.
