Difference between revisions of "ログイン / 接続"
From GXtest Wiki
| Line 4: | Line 4: | ||
|ログイン / 接続 | |ログイン / 接続 | ||
}} | }} | ||
| − | |||
| − | [[GXtest Designer-GUI|<- | + | [[GXtest Designer-GUI|<- 前へ]] | [[GXtest Designer ユーザーズマニュアル|インデックス]] | [[GXtest プロジェクト|次へ-> ]] |
| − | == 2. | + | == 2. ログイン / 接続 == |
| − | + | GXtest プログラムを実行すると、次の画面が表示されます。<br> | |
[[image:login.jpg| center]] | [[image:login.jpg| center]] | ||
| − | + | ここでは、GXtest が接続するデータベースおよび接続するユーザーを選択することが可能です。指定したデータベースにユーザーアカウントが存在しない場合、ユーザー名「Guest」で接続することができます。 | |
| − | === | + | |
| − | + | === 接続の管理 === | |
| + | ログイン画面には、データベースのリストのとなりに 2 つのボタンがあり、最初のボタンは接続の編集に使用され、2番目のボタンは新規の接続に使用されます。[+] ボタンを押すと、次のウィンドウが表示されます。 <br> | ||
[[image:AddConnection.jpg| center]] | [[image:AddConnection.jpg| center]] | ||
| − | + | このウィンドウに表示される内容: | |
| − | * | + | * 新規接続の名前 |
| − | * | + | * 接続に使用される SQL Server のインスタンス |
| − | * | + | * データベースの名前 |
| − | * | + | * データベースにアクセスするための認証モード |
| − | + | ||
| + | 一度接続を追加すると、ログインウィンドウに表示され、異なるプロジェクトのリポジトリおよびユーザーの PC から直接テストケースにアクセスすることが許可されます。 | ||
---- | ---- | ||
| − | [[GXtest Designer-GUI|<- | + | [[GXtest Designer-GUI|<- 前へ]] | [[GXtest プロジェクト|次へ -> ]] |
| − | + | [[GXtest Designer ユーザーズマニュアル]] | |
Revision as of 20:38, 26 March 2014
2. ログイン / 接続
GXtest プログラムを実行すると、次の画面が表示されます。
ここでは、GXtest が接続するデータベースおよび接続するユーザーを選択することが可能です。指定したデータベースにユーザーアカウントが存在しない場合、ユーザー名「Guest」で接続することができます。
接続の管理
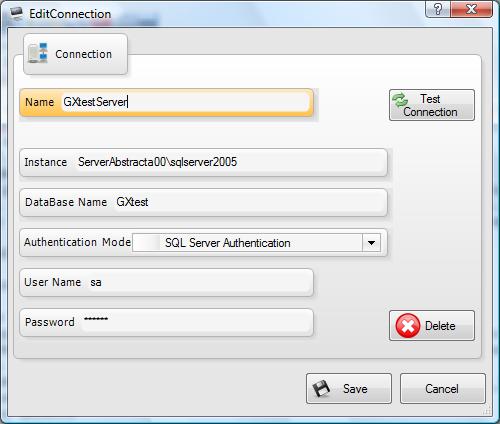
ログイン画面には、データベースのリストのとなりに 2 つのボタンがあり、最初のボタンは接続の編集に使用され、2番目のボタンは新規の接続に使用されます。[+] ボタンを押すと、次のウィンドウが表示されます。
このウィンドウに表示される内容:
- 新規接続の名前
- 接続に使用される SQL Server のインスタンス
- データベースの名前
- データベースにアクセスするための認証モード
一度接続を追加すると、ログインウィンドウに表示され、異なるプロジェクトのリポジトリおよびユーザーの PC から直接テストケースにアクセスすることが許可されます。

