Difference between revisions of "クリックメニューコマンド"
(Created page with "category:GXtest Commands {{Idiomas|Comando ClickMenu|ClickMenu Command}} The ClickMenu command is specifically employed in GxTest for the various and different types of ...") |
|||
| (12 intermediate revisions by 4 users not shown) | |||
| Line 1: | Line 1: | ||
| − | + | {{Idiomas | |
| − | {{Idiomas|Comando ClickMenu|ClickMenu Command}} | + | |Comando ClickMenu |
| + | |ClickMenu Command | ||
| + | |クリックメニューコマンド | ||
| + | }} | ||
| + | [[category:GXtest コマンド]] | ||
| + | ClickMenu コマンドは、GeneXus で実装可能な異なるタイプのさまざまなメニュー向けに GXtest で使用できる機能です。いくつかのユーザーコントロールも ClickMenu コマンドの対象です。 | ||
| − | + | たとえば、次の外部メニューがサポートされています: | |
| − | + | ||
| − | + | ||
* JSCookMenu | * JSCookMenu | ||
* SmoothNavMenu | * SmoothNavMenu | ||
* PXToolsMenu | * PXToolsMenu | ||
| + | 前述したすべてのコマンドで、ClickMenu を使用することができます。定義された文字列で分割されたメニュー/サブメニューの選択が必要となります。 | ||
| + | |||
| + | メニューの区切り文字では、下図の通り、GXtest Designer で、[オプション] > [ローカルの設定] > [その他] > [メニューの区切り文字] でアクセス可能な設定ウィンドウを定義することができます。 | ||
| + | |||
| + | [[File:SetSeparatorChar.PNG]] | ||
| + | |||
| + | 使用可能なオプションは次のとおりです: | ||
| + | * スラッシュ ('/') | ||
| + | * カンマ (',') | ||
| + | * セミコロン (';') | ||
| + | * ドット ('.') | ||
| + | * パイプ ('|') | ||
| + | * コロン (':') | ||
| + | * 番号 ('#') | ||
| + | |||
| + | これらのコマンドすべてにクリックメニューを使用できます。このとき、メニューとサブメニューをスラッシュで区切って選択する必要があります (メニュー/サブメニュー)。 | ||
| + | |||
| + | 例を示します: | ||
| + | ClickMenu(Menu1, 'File/Save As/File PDF') | ||
| + | |||
| + | == ClickMenu - GXtest Recorder == | ||
| + | GXtest Recorder でこのコマンドを記録するには、メニューの区切り文字が Record Settings ウィンドウで定義されている必要があります。 | ||
| + | |||
| + | [[File:RecSett.PNG]] | ||
| + | |||
| + | 指定された文字列は、GXtest Designer で定義された文字列と同じでなければなりません。それにより、GXtest Recorder で記録されたテストケースが適切に実行されます。 | ||
| + | |||
| + | |||
| + | [[File:RecSetOpened.PNG]] | ||
| − | |||
| − | |||
| − | + | 次に、メニューが正しく機能するために必要な追加情報を指定します。 | |
| − | == | + | == 追加構成 == |
* PXToolsMenu | * PXToolsMenu | ||
| − | + | このメニューは、GXtest Recorder を使用したテストの記録では、ネイティブにサポートされていません。ただし、GXtest Designer に追加して使用できます。これを踏まえ、アプリケーションのテストに必要なパスを「メニュー/サブメニュー/オプション」の形式で展開することで実行できます。 | |
| − | + | 実行するためには、このファイルを解凍し、GXtest でテストするアプリケーションの KB にインポートすることが必要です。このファイルには、メニューの制御の定義とサンプルオブジェクトが含まれます。インポート処理が完了したら、インポートされた object.control に対して、次のようにクリックメニューコマンドを使用できます: | |
[[Image:MenuPXToolsExample.PNG]] | [[Image:MenuPXToolsExample.PNG]] | ||
| − | |||
| + | この例では、メニュー「Tables」からオプション「Objects」が選択されます。 | ||
| − | + | メニューの定義が含まれるファイルをインポートするには、GXtest Designer で [ナレッジベース] メニューから [一部の KB 情報を更新] を選択します。 | |
[[Image:UpdatePartialKB.png]] | [[Image:UpdatePartialKB.png]] | ||
Latest revision as of 01:00, 25 September 2017
ClickMenu コマンドは、GeneXus で実装可能な異なるタイプのさまざまなメニュー向けに GXtest で使用できる機能です。いくつかのユーザーコントロールも ClickMenu コマンドの対象です。
たとえば、次の外部メニューがサポートされています:
- JSCookMenu
- SmoothNavMenu
- PXToolsMenu
前述したすべてのコマンドで、ClickMenu を使用することができます。定義された文字列で分割されたメニュー/サブメニューの選択が必要となります。
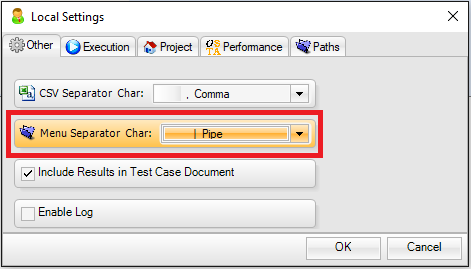
メニューの区切り文字では、下図の通り、GXtest Designer で、[オプション] > [ローカルの設定] > [その他] > [メニューの区切り文字] でアクセス可能な設定ウィンドウを定義することができます。
使用可能なオプションは次のとおりです:
- スラッシュ ('/')
- カンマ (',')
- セミコロン (';')
- ドット ('.')
- パイプ ('|')
- コロン (':')
- 番号 ('#')
これらのコマンドすべてにクリックメニューを使用できます。このとき、メニューとサブメニューをスラッシュで区切って選択する必要があります (メニュー/サブメニュー)。
例を示します: ClickMenu(Menu1, 'File/Save As/File PDF')
ClickMenu - GXtest Recorder
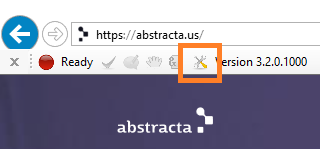
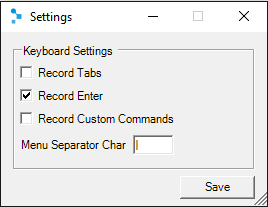
GXtest Recorder でこのコマンドを記録するには、メニューの区切り文字が Record Settings ウィンドウで定義されている必要があります。
指定された文字列は、GXtest Designer で定義された文字列と同じでなければなりません。それにより、GXtest Recorder で記録されたテストケースが適切に実行されます。
次に、メニューが正しく機能するために必要な追加情報を指定します。
追加構成
- PXToolsMenu
このメニューは、GXtest Recorder を使用したテストの記録では、ネイティブにサポートされていません。ただし、GXtest Designer に追加して使用できます。これを踏まえ、アプリケーションのテストに必要なパスを「メニュー/サブメニュー/オプション」の形式で展開することで実行できます。
実行するためには、このファイルを解凍し、GXtest でテストするアプリケーションの KB にインポートすることが必要です。このファイルには、メニューの制御の定義とサンプルオブジェクトが含まれます。インポート処理が完了したら、インポートされた object.control に対して、次のようにクリックメニューコマンドを使用できます:
この例では、メニュー「Tables」からオプション「Objects」が選択されます。
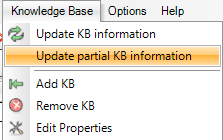
メニューの定義が含まれるファイルをインポートするには、GXtest Designer で [ナレッジベース] メニューから [一部の KB 情報を更新] を選択します。


