スマートデバイス用のテストケースの作成
スマートデバイス用の最初の GXtest テストケースの作成には、アプリケーションの作成で作成した GeneXus サンプル Android アプリケーションを使用します。 このサンプルアプリケーションは、顧客および会社の情報を保存する非常に単純なアプリケーションです。
ここでは、新しい会社を追加し、その会社がアプリケーションデータに実際に追加されたかどうかを確認するテストケースを新規作成します。
前提条件
まず最初に、テスト対象となる Android アプリケーションを生成する必要があります。したがって、前述の GeneXus チュートリアルを完了する必要があります。
その次に、エミュレーターまたは実際のデバイスでAndroid での実行要件が満たされていることを確認します。
また、GXtest プロジェクトの作成とプロジェクト用 KB のセットアップもすでに完了しているものとします。追加情報については、GXtest プロジェクトおよびGXtest および GeneXus KBの記事を参照してください。
Create a new test case for Smart Devices
Before we start designing the test case, it is recommended we manually follow the steps to create a new company in the mobile app, so we get to know the process and the steps we will automate later with GXtest. To run the app in the emulator/device from GXtest Designer, we can click in the "Launch application in device" button located in the toolbar, and also in the Smart Devices menu. In order to add a new company, from the main app menu we select the option "Work With Devices Company", tap on the button Insert, fill a company name and tap on Save. That will take us back to the company list, where we should see the company we just created.
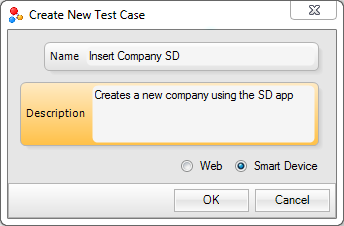
To start creating the new test case, we go to the menu Test cases -> New.
At the time we need to choose a name, we also need to specify the main platform of the test case. In our case, we will choose 'Smart Device'
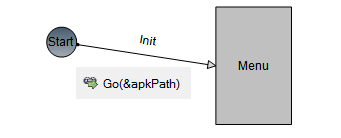
Now that we have a new empty test case, we will drag and drop a new SDPage from the Objects toolbar. This SDPage will represent the first screen the application shows when we start the execution, and it will match with the GeneXus object called Menu. Once we have the SDPage in the test case, we double-click the SDPage and we choose the Menu object from the object selector window.
After that, we must connect the start node to the Menu SDPage, so we drag the edge arrow to accomplish this. To make the application execute, we must add a Go command, as we do with the Web test cases to open the browser on a new URL. On a Smart Device test case, the Go command will install/launch the application in our device or emulator. So, we add a Go command on the first edge, and as the value parameter we must put the path to the APK file of the Android app in our computer. Luckily, we already loaded this path in the &apkPath variable in the Requirements for executing in Android.
At this ponint, we can execute the test case as it is, in order to check that the app launches on the selected emulator/device.
Now we can continue with the test case design. We should add a new command TapText in the Menu SDPage, which taps on the "Work With Devices Company" item of the menu (so we will have a TapText("Work With Devices Company")). This tap should take us to the CompanyList page, so we must add another SDPage associated with the CompanyList GeneXus object, and connect the Menu SDPage to the latter one through a new edge.
Once in the CompanyList page, we must tap on the Insert button to go and create a new company, so we will add a new Tap command over this button, on the SDPage associated with CompanyList. The command should look like this: Tap(CompanyList.ButtonInsert)
After that, we will create a new SDPage, corresponding with the screen that allow us to create/edit/update a company. This page will be the CompanyGeneralSection GeneXus object, so we must assign this object to the SDPage, and connect the CompanyList node to this one.
Finally, at the last SDPage (CompanyGeneralSection), we will write the name for the new company (for example "My Company"), and then press the "Save" button.
In order to automate those two last steps, we will add the commands in the CompanyGeneralSection SDPage:
- FillInput(CompanyGeneralSection.CompanyName, "My Company")
- Tap(CompanyGeneralSection.ButtonSave)
At this point we completed the steps to create the new company, but it would be nice to verify on the same test case that the company has been successfully registered. So we will add one last SDPage associated to the CompanyList object, which is the page where we get after saving the new company. In this last page, we will add a validation that checks that the new company ("My Company") appears in the list. This is done with the AppearText("My Company") command.
Run the test case and check that all steps are successfully completed, including the last validation.
Now that we have our first test case, we can change the fixed values we used in the test case flow and use datapools instead. This makes our test cases easier to maintain and extend with new data.
Extending the test case to the Web
Is is possible to create an hybrid test case, which means that the test case can execute some steps on a mobile device, and other steps oven the Web application (in any order). For example, we may need to check on the Web version of the application if the new company appears, after we created it on the Smart device app.
To create this kind of test cases, we should include the test cases that automate the steps in one platform at a time. For example, suppose we already have a Web test case that searches "My Company" on the Web, and also the test case we already created for adding a new company on the Android app.
So, we only need to include both test cases in a third test case, connecting them through an edge, like this:


