Impact on Test Cases when the GX KB changes
In this tutorial you will see how to Update a KB: Impacting the KB’s changes in Test Cases in a concrete example.
Contents |
Needed files to follow this example
To complete the following guide you will need to download the following file:
UpdateAjaxSample.rar: Compressed .rar file with:
- AjaxSample.gxt: This file contains the first version of the AjaxSample KB
- NewAjaxSample.gxt: this file contains a modified version (changes that could have been made by developers) of the AjaxSample KB
- AjaxSample.zip: It's a project with 3 test cases
Impact analysis (updating a KB) step by step
Step 1: Create the project
First you need to create a new project that needs to be associated with the AjaxSample.gxt file. For more help on doing this see Starting out with GXtest.
Then import the project (file AjaxSample.zip).
Step 2: Change the KB path
The purpose of the article is to see how changes during development impact Test Cases. In order to see these changes you must change the KB that GXtest is working with. To do this you can change the KB Path to NewAjaxSample.gxt, which is the same as the first file but with few changes. To get GXtest to use the new KB you must go to:
- Knowledge Base -> Edit Properties
- Change the path to NewAjaxSample.gxt
The changes made in the AjaxSampleComplete_modified.xpz KB are the following:
- A renamed object (Client is now SuperClient)
- A renamed control (confirmation > enter)
- A renamed attribute (ClientFirstName -> ClientName)
Note: This changes will also change objects generated by Work With Pattern.
Step 3: Update KB Information
Now you are ready to perform the impact, to do so go to Knowledge Base->Update KB Information
Pre Impact
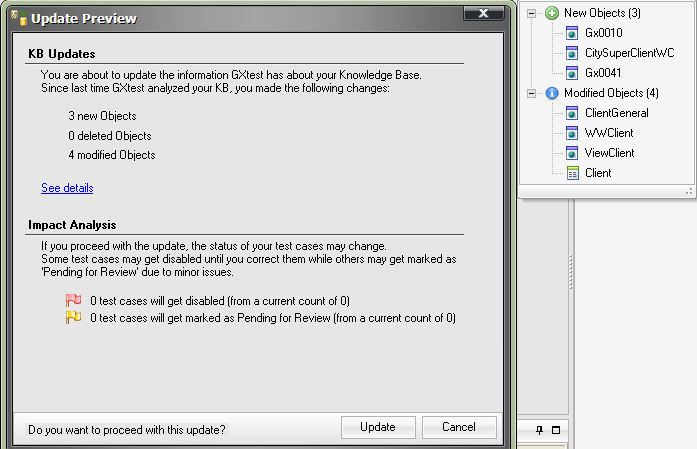
In this screen, we will see:
- Knowledge Base's changes
- Test Case's changes
Knowledge Base
We'll see:
- New Objects
- Modified Objects
- Deleted Objects
You can see a detailed list, by clicking "See details" link.
This changes will be committed when "Update" button is pressed, but you should check what issues (if any) will appear in the test cases.
Issues
When developers rename objects or controls, the test cases need to be updated.
Many times, it's impossible to update a test case (think what happen if you delete an object used in a test case), then, a red issue will appear.
You can resolve this kind of issues later.
| It’s important to keep in mind that if you are using GeneXus X or higher GXtest will automatically detect which objects and controls have been renamed and it isn’t necessary for you to do so. |
|---|
In general, GXtest updates every change automatically, impacting in that way all the test cases.
Another kind of issues, is when GXtest is not 100% sure about a change, and warns you to see detailed issue.
e.g.
- Control BUTTON_1 is used but is no longer available (deleted), but, control BUTTON_2 is new and is handling the same event.
This will generate a warning (yellow issue).
Resolving Issues
After applying the changes in the KB the test cases will be in one of those three states
- Ready: there is no issue to verify
- Pending Review: automatically changes were made and they should be verified
- Disabled: the test refers to an object that does not exist or something similar, which makes it impossible to run.
Changes in the KB can make the test case disabled until a user manually corrects missing references. This can happen if you delete an object used in a test, perhaps by changes in requirements, etc..
