GXtest Designer User's Manual 1.0
This page discusses the main features of GXtest Designer.
Introduction
The objective of GXtest Designer is to easily model a Test Case and do the same for application made with GeneXus on different platforms and with different versions of GeneXus.
Test Cases are modeled on an as a diagram made up of a cluster of Nodes and Edge Lines, where the nodes represent the pages of an application and the edge lines represent the events that happen going from one Page to another. These elements (pages and events) can have commands associated with them. There are three types of commands: actions, validations and events. The three types are explained in more detail in the Commands section. In addition, you can include embedded Test Cases in a model to create modules that can be reused. You can also include Decision nodes that choose which action to be taken depending on the result of a Validation. All of these concepts will be explained in more detail in the manual.
GXtest Designer GUI
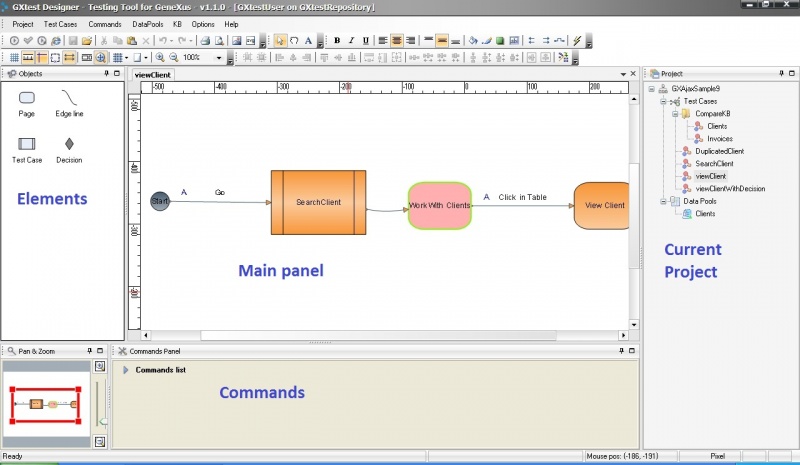
The image below shows the different parts of the GXtest Designer GUI.
- Main Panel: the main panel displays the Test Cases and the results of their execution. It is the program main work area.
- Projects: This panel contains all project elements such as Test Cases and Data Pools.
- Elements: This panel contains all elements of a Test Case. The elements can be dragged to the main panel in order to build Test Cases.
- Commands: This panel displays the commands (actions, validations and events) of each element of a Test Case .
Besides these four main panels, the image also shows a toolbar used to help build Test Cases as well as the Pan & Zoom feature that allows navigation and zooming within the Test Case.
Login / Connections
When the GXtest program is run it brings up the following screen:
Here it is possible to choose which database GXtest will connect to and with which user you will connect. If user accounts don’t exist in the specified database it is possible to connect with the username Guest.
Connection Management
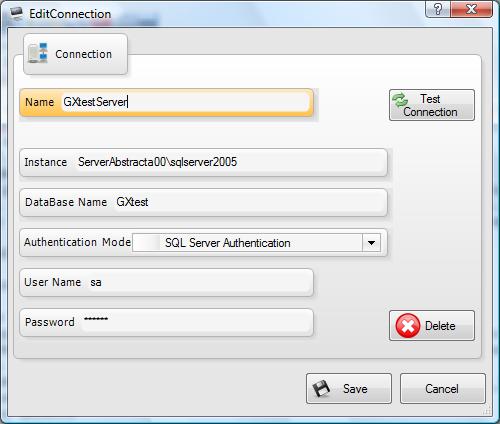
In the same Login screen, next to the list of databases there are two buttons, the first is used to edit connections and the second adds a new connection. Pressing the + button brings up the following window:
In this window you can indicate:
- The name of the new connection
- The instance of the SQL Server that will be used to connect
- The name of the database
- The authentication mode used to access the Database
Once you have added the connection it will appear in the Login window allowing users to work with different project repositories and Test Cases directly from their machine.
Projects
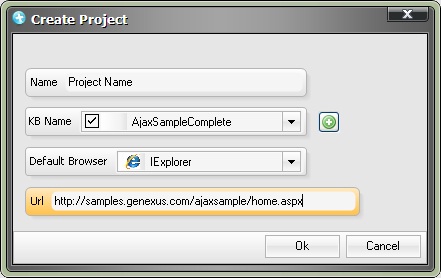
The first step to begin using GXtest is to create a project. To do this click on Project > New Project. In the new window you can specify the project’s properties.
- Name of the project
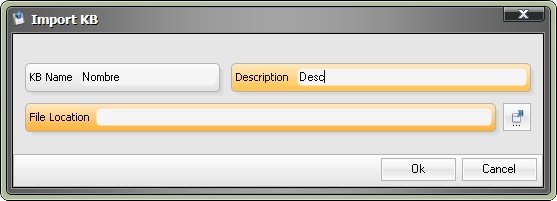
- The KBs associated with the project (see also how to import a GeneXus KB)
- Default Browser
- Default URL
The name entered will identify the project. The KBs (Knowledge Bases – GeneXus source code) are the applications to be tested. You can choose a several KBs when an application is made up of more than one for example applications that use GXportal o GXflow. A KB imported into GXtest can only be used in one project and cannot be shared. The default browser that will be used (this version allows you just to use Internet Explorer). The default URL has two functions:
- First it is used when you begin to record a Test Case, the browser will suggest this URL.
- Second, if a Test Case uses the variable urlHome, (which will be used in tasks done by GXtest Manager), the default URL will be used for this variable. For more information about this property in GXtest Manager see the GXtest Manager Manual.
You can open a project by going to Project > Open Project. If you decide to delete the open project, go to Project > Delete Project. Remember that this will not delete the KBs associated with the project.
Exporting and Importing a project
GXtest allows you to export all the Test Cases of a project and its Data Pools. This allows you to duplicate a project if it is necessary. It is important to remember that the export will not export the KBs associated with the project. In order to duplicate a project you must export it and then import it using the following steps:
- To export a project go to Project > Import & Export > Export Project. Here you can choose the project to be exported and where you would like to export the file that contains the exported project. GXtest then opens a new window displaying the test cases and Data Pools that were exported.
- Creating a new project: Create a project and associate it with the same KBs as the project exported in step 1.
- To import the project go to Project > Import & Export > Import Project and select the project created in step 2. GXtest will then ask you to choose the ZIP file that contains the data from the project exported in step 1. When finished, GXtest will display the results of the import.
GXtest and GeneXus KBs
GXtest automates applications by relating user’s actions with the KB’s objects instead of HTML objects like traditional testing tools do. This allows it to have traceability between Test Cases and to use the Test Cases independently of the technology used similar to using GeneXus.
| Important: Each KB that is imported into GXtest can be associated with only one project, that being so if you create a new project you will only be able to associate with it KBs that are not being used by any other project. |
|---|
Importing a GeneXus KB into GXtest
To work with GXtest you need to import the information from the KB or KBs into the application to be tested. The information needed from the KB are the WebForm controls for Transactions and WebPanels. It doesn’t use anything else related to the programming, events or anything else.
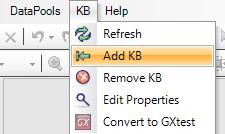
If you don’t want to import an entire XPZ, you can use the convert function to send only the data needed by GXtest. To do this go to KB > Convert to GXtest.
Note: It is recommended that when importing KBs they should be accessed locally because network access creates a large increase in the response time.
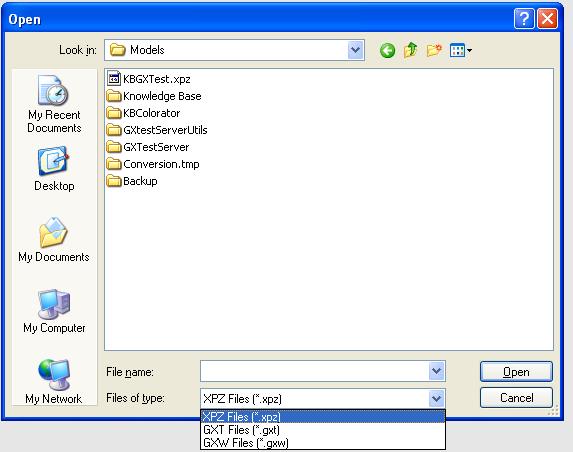
These kinds of KBs can be imported into GXtest by using an XPZ, GXPublic, GXBL, or .gxt file.
Choose the location and the file type: (gxt, gxw o gxt)
In GeneXus 8 or 9 you can use xpz files, gxw files (its in the KB folder) or a gxt file (gxt file its a XML file that contains only the KB that GXtest use).
In GeneXus X o higher you can use a gxt file or gxw file.
Once you have selected the type and location, click Ok.
GXtest Extension
GXtest Extension is a GeneXus X extension that allows you to export KBs in GXT format.
Note: extension installation is optional, GXtest can connect to KB directly.
To install it, copy the GXtest Extension.dll file located in the GXtest Designer installation folder to Packages in GeneXus directory. After restarting GeneXus, go to Extension Manager in Genexus an check in the extension name. Then restart GeneXus again and open the KB and go to Extensions > GXtest. The export will begin and when it is finished it will ask you where you would like to save the exported file.
You can also download this extension in GeneXus Marketplace.
Modify Knowledge Base Properties
Sometimes you need to change the path to the KB in order to update it (when select "Refresh KB" GXtest uses the same path that you selected at the moment of importing the KB). To do that (with the Project already opened), go to KB menu and select "Edit Properties". Then select the KB and insert the new path.
Updating your KB: Impacting the KB’s change on Test Cases
On you automate a set of tests, the development team will continue developing and changing an application. Therefore it may be necessary to update the information in the KB that GXtest is working with and impact the Test Case. Just go to the menu Knowledge Base -> Update KB Information.
You can see an entire example of KB update here: Impact on Test Cases when the GX KB changes
Use KB that uses GXFlow or GXPortal
When your application uses GXPortal (in Genexus 8, 9, X or higher) or GXFlow (in GeneXus X o higher) you need to bind those KBs to the project. The GXtest project must be binded to the application KB plus the GXFlow's KB and/or GXPortal's KB. The metadata of GXFlow's KB for the GeneXus Ev1 is here.
If you don't do that, GXtest is going to fail trying to record or execute test cases who need references to objects from those KBs.
Test Cases
Within each project there are the Test Cases for the application to be tested. Each Test Case is an automated workflow for an application, which can be used to automate regression tests. See also Advice for when to automate.
Test Case Objects
Page
A Page refers to a page of an application and can have a list of actions and a list of validations.
Each page can be associated with a GeneXus object. Test Cases generated with the Recorder will always have the GeneXus object associated and even when you do it manually it is not always necessary to select the object. When there are more than one frame in the same window or when there are more than one window (for example a popup) at the time of running a command, in those cases you must select the object. In addition, while it is running a validation is performed that the page corresponds to the object defined on the page (with the command CheckMainObject).
Edge Line
Each Edge Line represents the transition from one page to the next. Each one has exactly one event. It can also have a list of actions and a list of validations.
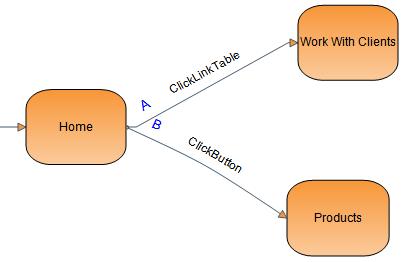
One peculiarity about edge lines is that they have a specific order. Each Edge Line has a letter that indicates the order in case there is more than one Edge Line for a node. Take for example the folloing case:
The first time you go to the Home page you will follow the edge line ClickLinkTable, but when you return to that same page a second time you will follow the edge line ClickButton.
Test Case (Inclusion)
A Test Case object allows you to embed a Test Case within another Test Case (modularize). This allows you to reuse Test Case models. To see and example of an embedded Test Case consult the following article. When embedding an Test Case within another Test Case you can tell GXtest how many times you want to run the embedded Test Case. This value can be a specific number or it can be taken from a Data Pool. When it is taken from a Data Pool you are able to, for example, vary the quantity of items in a invoice depending on the Data Pool.
An important aspect to highlight is that a failure of the execution of one of the iterations of an included test case that is configured to stop the execution when fails, it also will stop the execution of the test case that includes it.
Decision
A decision object allows you to follow two different workflows within an application based on certain conditions. For example, if our Test Case sends a notification to a client if he/she is from Uruguay, but sends nothing if the client is from another country, we can use a Decision to follow one workflow or another depending on where the client is from.
To see an example using Decision see Creating a Test Case with Bifurcation
Creating a Test Case
A Test Case can be created many ways. It can be done manually or by recording it with GXtest Recorder. GXtest Recorder can record a Test Case two ways: on-line and off-line.
Creating a Test Case manually
To create a Test Case manually, select Create New Test Case from the Test Case menu in the project panel.
This creates a Test Case that will remain open in the Models panel. In this new blank page you can begin to model the Test Case. To do so you must draw the workflow to be automated by creating the pages to be visited and connecting them with Edge Lines.
Once the workflow is ready, you must define the commands that will be run for each Edge Line and each Page.
See also list of available commands.
| The Drag and Drop commands allow for easy construction of Test Cases in the Model editor, it is possible to simply drag and drop commands between different components (Edge Lines and Pages). This allows you to move or copy if you hold down the Control key. |
|---|
Creating a Test Case with GXtest Recorder
The difference between On-Line and Off-Line is that the former uses GXtest Recorder together with GXtest Designer so that when you record a Test Case it remains in GXtest Designer ready to use. Whereas using the Off-Line method, GXtest Recorder works separately from GXtest designers and generates a file that later must be imported into GXtext Designer.
On-line Method
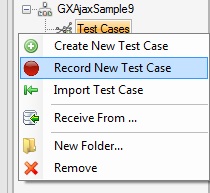
To record a Test Case using the On-Line method select Record New Test Case form the Test Cases menu.
This will open a window that allows you to enter a name for the Test Case and the URL where you want to begin to record. Once you click the Record button a new browser window will open where you can begin to perform the necessary actions. Once you have finished the workflow that you want ot automate simply close the browser window.
Off-line Method
As explained before the Off-Line method allows you to create a Test Case without having to have GXtest Designer installed. This will create a ZIP or XML (since v1.1.4) file that can be imported into GXtest Designer.
Once the ZIP/XML file is created you must create a new Test Case by selecting Import from the Test Cases menu (in the project Panel).
Then choose the ZIP/XML file created previously.
The advantage to this method is that it is not necessary to have GXtest Designer installed in order to automate, you only have to install the extension in Internet Explorer. This also makes it easier for any user to record a workflow for an application if they need technical support or if they are defining acceptance tests etc. For more details see GXtest Recorder User's Manual.
Test Case Validation
Before running a Test Case you should perform a validation. If a Test Case does not meet all the conditions to run it will not be run. Some of the possible causes for a Test Case to not be able to run are that there are no events on a certain Edge Line or that a connection is missing. To validate a Test Case press Shift+F6 or click the following button in GXtest:
Running a Test Case
In GXtest Designer there a several ways of running a Test Case which are described below.
Simple Running of a Test Case
You can run Test Case once by pressing Shift+F5 or clicking the button shown below
This will run the open Test Case one time.
Running a Test Case repeatedly
This allows you to run a Test Case as many times as you decide which allows you, for example, to use Data Pools. To repeatedly run a Test Case press Shift+F7 or click the button shown below:
Running a Test Case in an opened browser window
This allows you to run a Test Case in a browser window that is already open. To run a Test Case in an open browser press Ctrl+F5 or click the following button:
Note: If you are using Firefox browser (GXtest 1.1 or upper) this functionality can only be used with browser instances opened for GXtest or setted to start with-jssh.
Execution in FireFox (from version 1.1)
To run tests using FireFox browser in versions 2, 3, 3.5 and 3.6, you should download the plug-in jssh and install it. The plugin can be downloaded at the following links:
Then to tell GXtest Desginer to run using FireFox, change the project properties to the type of browser FireFox.
Note: We recommend disabling automatic updates and "Set as default" dialog in FireFox to avoid failures in the test cases due to this reason.
| Important: while running a test case in any browser, GXtest is going to close automaticaly any popup like "do you want to activate autocomplete" or similar ones. |
|---|
Advice for working with Test Cases
The following lists a couple pieces of advice concerning editing Test Cases.
- Copy and Paste commands with Drag&Drop: in GXtest its possible to move commands from one element to another by simply dragging them and dropping them. You can also copy commands by holding down the Ctrl key while dragging and dropping.
- Changing the order an element’s associated commands: click on the element in the commands panel and drag the commands placing them in the desired order.
Exporting and Importing a Test Case
This article shows the specific steps for importing and exporting a Test Case. If you would like more detailed information about XML generators and exporting Test Cases you can consult this article.
Sending and Recieving Test Cases between databases
As mentioned in the Login / Connections section, in GXtest it is possible to configure several connections. This allows:
- an easy exchange of Test Cases between databases
- exchange of Test Cases between workstations and the GXtest Manager database
| It is important to keep in mind that the names of the projects that contain the Test Cases that are to be transferred ought to be the same. |
|---|
Internally what happens is an export and then an import of the Test Cases into the corresponding databases. To send a Test Case follow these steps:
- Open GXtest using the connection for the original database
- Open the project
- Go to Test Cases > Send & Receive > Send To
- Select the Test Case that you want to send
- Choose the data that you want to send it to
- It will now show the export options (they include Data Pools, recurring Test Cases, etc.) Then click OK
- It will now show the results of the export. Close the results window when finished.
- It will now show the results of the import.
To receive a Test Case follow these steps:
- Open GXtest using the connection for the original database
- Open the project
- Go to Test Cases > Send & Receive > Receive From
- Choose the database that is going to receive the Test Case
- Then choose the Test Case that is going to be received and the options that you want.
- You will then see the results of the export and then the results of the import in the local database.
Commands
Commands allow you to express the interactions that you want an application to perform as well as validations of the expected state of an application after each of the interactions. Commands can be actions, validations and events. Each of these can have parameters that indicate when they should run within an application.
Actions are done by a user within a webpage and don’t move you to another page. Some examples of actions are FillInput (to insert a value into a field on the page) and Check (to tick a checkbox).
There are also events that are interactions that cause you to move from one page to another. Some example of events are Go (the same as typing a URL into a browser), ClickLink (used to click a link within a page) and ClickButton (used to click a specific button).
Lastly there are validations which are used to validate that the resulting state of an application is what was expected. Some examples of validations are AppearText (checks if a text is present or not) or VerifyControlText (compares the value of a control on the screen with a reference value). Validations always have two mandatory parameters in addition to their other parameters.
- Error Description Parameter: this is shown if a validation fails and describe why the failure occurred.
- Negation Description Parameter: this shows that the expected result is the negation of the validation. For example if you negate the validation AppearText it says that you don’t want a certain text to appear.
Parameters
Each command recieves a list of parameters. The kinds of parameters that a command can have are described below:
Control Parameter
This kind of parameter is used to create a control within a GeneXus object. Transaction and WebPanel objects in GeneXus have an associated WebForm, this WebForm has an associated set of controls that specify the information to be shown and the interaction that the user can have with the object. For example, a button or a field where you can enter values are controls within a WebForm object.
Value Parameter
Value parameters refer to a fixed value, be it text or a number, that you want to use in a command.
Variable Parameter
GXtest allows you to capture values returned by an application and store them as variables. These variables are then used in other commands. (See Creating a Test Case with Variables for more information.) There is a standard variable called urlHome that uses the value defined in the project’s URL property when the Test Case is ran with GXtest Designer or that uses the value defined by the URL property associated with the task when it is run with GXtest Manager.
Data Pool Parameter
Data Pools allow you to use external data in a Test Case. Data Pool parameters allow you to tell a command to take values from a specific data source.
SelectionByRow Parameter
Commands that are run within tables have a parameter the tells them which row within a table they should use to run an action. This parameter referred to generically as SelectionRule can actually be two types SelectionByRow or SelectionByControl. SelectionByRow is used to specify the row where the action will take place and is indicated by the row number. In this way you can model in GXtest actions such as “Click on the first row of the grid.” Because of this the parameter has a Data Pool subparameter, value or variable. This parameter can be a positive number which indicates the row (where the first row is referenced by number 1). If you want to select the last row you can use the keyword "last" instead of a number.
SelectionByControl Parameter
The SelectionByControl parameter is used to specify the row in table to be used based on a value in one of its columns. For example you can tell GXtest to select the row which contains Employee Number 59. GXtest will search the table and select the row with the first instance that matches the established criteria. This parameter has two subparameters:
- Control Type Parameter indicates the column where GXtest will begin to search for the established criteria
- Type of Comparison and comparer indicates if what is to be compared is text or a number and the comparison that will be used (equal to, more then, less than, contains, etc.)
- Variable Type Parameter, Data Pool or Value: it’s the value that is going to be compared.
List of Commands
| Actions | |
|---|---|
| Check | Allows you to tick or check a CheckBox |
| CheckTable | Same as Check but used for controls that are located in tables |
| Choose | Allows you to select an option from a RadioButton |
| Concatenation | Allows concatenation of fixed values, variables and values from DataPools |
| Execute | Execute a process (exe, bat, etc) |
| FillInput | Used to insert a value into a field |
| FillInputTable | Used to insert a value into a field within a table |
| GetValue | Allows you to obtain a value returned from an application and store it in a variable to later be used in another command |
| GetValueTable | Same as GetValue but used for values that are located in tables |
| Pause | Sleep the execution for some time. You should indicate the length of the pause in miliseconds |
| PressKey | Simulates a keystroke made by a user. For more information on how to specify different keys see the following reference |
| Random | Generates random sequences of numbers and characters of a given length |
| SelectCombo | Allows you to select a value from a list of values (combobox) |
| SelectComboInTable | Allows you to select a value from a list of values (combobox) that are found within a table |
| Summarize | Summarize a group of values |
| SelectRow | Allows you to select a row in a table |
| SetGridContext | Allows you to execute actions over controls in grids within grids. You can find more information in Inputs in Grids within Grids. |
| UnCheck | Allows you to uncheck a CheckBox |
| UnCheckTable | Same as UnCheck but used for controls that are located in tables |
| DPNext | Move to the next row of a Data Pool. You should always use DPNext before you begin to use a Data Pool, indicating the name of Data Pool |
| DPReset | Returns to the beginning of a Data Pool. Only you should indicate the name of the Data Pool |
| DragAndDrop | Drag a control to another one |
| StoreValue | Save a value or variable inside one DataPool in execution time |
| Events | |
| Back | The same as clicking the Back button in a browser |
| Go | The same as typing a web address (URL) into a browser |
| GoAndLogin | The same as the Go command except that it allows you to enter a username and password for applications that require it |
| Click | Clicks on a GeneXus control |
| ClickLinkByCaption | Clicks on a link. The difference between this event and the previous is that sometimes because of how an application is constructed the same control has more than one name. In these cases ClickLinkByCaption is used to specify the name of the link to be controlled |
| ClickMenu | Allows you to click in a menu item |
| ClickTable | Allows you to click on a control that is located in a table |
| ClickPrompt | Allows you to open a prompt to select values from a list |
| ClickPromptInTable | The same as the above except for fields that are located in a table |
| ClickPortalMenu | Allows you to open a specific menu of an application developed with GXPortal |
| ClickToolbarButton | Allows you to click on a toolbar button in an application made with GeneXus X and that uses a User Control with ExtJS |
| LoginPortal | Allows you to login to an application that uses GXPortal for security |
| ClickTree | Allows you to open a menu developed with ExtJS TreeMenu (in an application made with GeneXus X and that uses a User Control with ExtJS) |
| Close | Closes a window |
| PressKey | Idem to the action, but for those keys that produces a transition to other page (like an enter) |
| DummyEvent | Does nothing. Used to go form one page to another without performing an event |
| Validations | |
| AppearText | Checks if a specific text is or is not on the screen. It can also be used for validations performed by Ajax. If it indicates a GeneXus object associated with the node where the command is being run, it will search the text in the frame that contains this object. If it is not indicated then it will look in the main frame |
| IsItemInList | Verifies if an especific item exists in a list of items |
| TableOrderedBy | Checks to see if a table is sorted by a given column |
| TableRowsNumber | Checks the number of rows of a given table |
| VerifyColumnVisible | Verifies if a column is visble in a grid |
| VerifyControlEnable | Verifies that a control is enabled |
| VerifyControlEnableTable | Same as VerifyControlEnable but used for controls that are found in a table |
| VerifyControlVisible | Verifies that a control is visible |
| VerifyControlVisibleTable | Same as VerifyControlVisible but used for controls that are found in a table |
| VerifyControlFocus | Verifies if the current application focus is in the right control |
| VerifyControlFocusTable | Same as VerifyControlFocus but used for controls that are found in a table |
| VerifyControlText | Compares a value displayed by a control with another value |
| VerifyControlTextTable | Same as VerifyControlText but used for controls that are found in a table |
| VerifyControlValidation* | Compares a value displayed in a balloon in a control |
| VerifyControlValidationTable* | Similar to VerifyControlValidation but used for controls within grids |
| AppearBalloon* | Checks if a balloon appears on a control |
| AppearBalloonTable* | Similar to AppearBalloon but used for controls within grids |
| Equals | Compares each other two Data Pool, Variables or values |
| VerifyItemsInList | Checks the list of elements in a list |
| VerifyItemsInListTable | Same as VerifyItemsInList but used for controls within grids |
| VerifyItemsInSuggestion | Checks the list of elements in a input suggestion list. |
| VerifyItemsInSuggestionTable | Same as VerifyItemsInSuggestion but used for controls within grids |
- *When execute a command above a balloon, GXtest waits to disappear the balloon to continue with the next command to execute.
Custom Commands
Sometimes extra features are developed to improve the user interface, using Javascripts or HTML by hand. In those cases GXtest it is not going to recognice the commands over these controls, and it is necessary that the user prepare his own GXtest commands. To do that you can use "Custom Commands". To learn more about it check Creating a Custom Command.
Use a command to invoke a Genexus Procedure
Many times it is very useful to invoke a Genexus Procedure to manage data or validations over that data. To learn more about it check Creating a command to use a GeneXus Procedure.
Data Pools
A Data Pool is a set of data that can be used in a Test Case. For example if we want to make a Test Case that enters into the system 100 new clients we can create a Data Pool called Clients that contains their name, ID number and telephone number. If you create a Test Case that uses the Data Pool to insert values into an application, every time that it is run the Test Case will use a different piece of data from the Data Pool. To see how to create a Data Pool and a Test Case that uses it see the page Creating a Test Case with Data Pools.
Data Pools are used in GXtest testing when working with data. They can be used not only to enter data into an application but also to validate the expected results of an application in order to choose which action to be performed.
Commands associated with Data Pools
The majority of the commands can have parameters from Data Pools but there are also certain commands specific for Data Pools which are the following:
- DPNext Move to the next row of a Data Pool. You should always use DPNext before you begin to use a Data Pool, indicating the name of Data Pool
- DPReset Returns to the beginning of a Data Pool. Only you should indicate the name of the Data Pool
- DPCompare: it is a validation type command that is used to compare a value from a Data Pool con another value
Scope of the data
An important concept within a Data Pool is the scope or the hierarchy of the data stored in a Data Pool. The scope can be of two types Global or by Test Case. For example you could have the following Data Pool:
| Scope | Name | Password |
|---|---|---|
| Global | pepe | pepe |
| Case A | juan | juan |
If you use a Data Pool in a Test Case that doesn’t have specific data assigned to it, you will use the global data (pepe in the example). Nevertheless if you assign specifc data to a Test Case then it will use that data.
Keeping in mind the previous Data Pool, imagine that in our Test Case we want to use different names and passwords to access a system. You can create a Data Pool called Users similar to the previous example. Assume now that the majority of the Test Cases use the username pepe and the password pepe and there is only one Test Case (Case A) that uses the username juan and the password juan. In order to resolve this issue you must enter the username pepe and the password pepe as global data and the username juan is entered as specifc to Case A.
If you use this Data Pool in Test Case Case B, it will return the value (pepe,pepe) which are the global values, but if you use it in Case A, it will return the value (juan,juan).
| Important: if a Data Pool has N data for a Test Case and you perform N+1 iterations, then the Data Pool will begin again with the first piece of data. |
|---|
Typically when you think of or design a Test Case, you do it conceptually and you do it in order to use data in the Test Case. Many times the different data sets are related, for example for a given country you want to enter it’s corresponding cities.
For example if you want to test the country, once you have the test case defined conceptually, you can decide to run the application with the following datasets:
- Set 1: Country: Uruguay, Cities: Salto, Paisandú, Montevideo and Atlantida
- Set 2: Country: Argentina, Cities: Rosario, Bariloche, Buenos Aires and Victoria
In this case it you need to tell GXtest that you are using a dataset in different yet related datapools and not using only one datapool.
This can be done using what is called SETID, set identifier. In this post there is an example of how to use this kind of datapool.
To perform this simply create two datapools, one named Countries and another named Cities, with the previous data and add to them a column called SETID. Now when you add a related dataset you just add an identifier for the related dataset in each row of data in the Countries and Cities datapools in the SETID column. It should be according the following format:
Master Datapool: Country - SETIDs are identifiers. i.e.: 1, 2, 3.
Related Datapool: Cities - SETIDs must be a master indentifier, followed by "." (a dot) followed by another identifier. i.e.: 1.1, 1.2, 1.3, 1.4, 2.1, 2.2, 2.3, 3.1
Doing so you will get the following datapools with the following data:
| Country | Cities | ||
|---|---|---|---|
| SETID | Country Name | SETID | City Name |
| 1 | Uruguay | 1.1 | Montevideo |
| 2 | Argentina | 1.2 | Salto |
| 3 | Brasil | 1.3 | Paysandú |
| 1.4 | Canelones | ||
| 2.1 | Buenos Aires | ||
| 2.2 | Rosario | ||
| 2.3 | Bariloche | ||
| 3.1 | Sao Paulo | ||
Then if you use the DPNext command on the Paises datapool, it will filter the datapools by the set identifier (SETID) .
In order to handle concurrent access of the GXtest database scheme there is a lock/unlock system over the artifacts on which they are working. Each element can be blocked by a user who is using it, indicating that he can change and is better if anybody else modify it. Then when he already modified it and saved it, he can "release" it to let the rest of the team work on it. When an item is checked out anyone can open it as read-only item. When someone creates an item automatically locks it for himself. If nobody else wants to modify it, it is possible to block it explicitly. This is useful when the one who wants to use it knows that it is blocked but nobody is really using it.
To lock an item, right click on the item, "Lock". To unlock an item, right click on the item, "Unlock". The elements that were blocked have an icon with transparent background, which are not blocked by anyone appear with a gray background, and if someone else has blocked it is displayed with red background.
