GXtest Recorder User's Manual
Contents |
Introduction
This page shows the main concepts of GXtest Recorder and provides guidance for use. The tutorial is based on the application GXAjax Sample. To follow the steps you must have GXtest Recorder component installed.
Grabar un caso de prueba
GXtest Recorder lets you record user actions performed on the browser in order to create a test case. Here we describe how GXtest Recorder works in an independently way of GXtest Designer. To do this you must open Internet Explorer and go to the page where you want to start recording.
center
Once you are there you should enter the name of the test case (eg TestCase1) and press the button Imagen:buttonRecord.jpg. At that time you'll see a window to select the folder where you want to save the generated file with the actions recordered. You must select a folder and confirm. At that time the look of GXtest Recorder changes and is as follows.
center
As you see the state now is Recording, so we can begin to perform actions on the browser which are going to be recorded.
Once we have finished with the test case, we should press the button Imagen:buttonStop.jpg. At that time you'll see a message indicating that it has completed successfully.
Adding further semantics to the Test Case
While a test case basically consists of a series of actions over the application, there are several elements which compose it and it is desirable to express them at the same time we are creating it. For this reason GXtest Recorder gives the user the possibility to express more fully the test case to allow enter the following:
- Selection criteria row in the grid
- Validations
- Variable Handling
- Comments
We are going to see in more detail each of these elements.
Selection criteria row in the grid
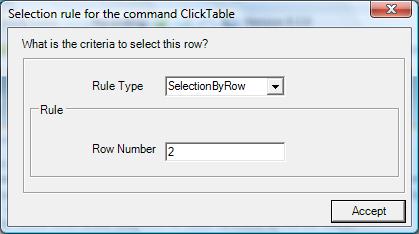
Whenever you perform an action on an item placed on a grid will be presented the next screen.

This screen allows the user to express the criteria by which he has performed the action in that particular row, to tell GXtest that what is wanted is to make the action in a particular row number (eg in the first one) or, on the contrary, they wanted to click a row with a value of one of the columns is one determined (for example if you want to click the product ID 1 no matter in what row it is located).
This ability to express the row on which we wish to act makes the test case better to capture the knowledge of the test.
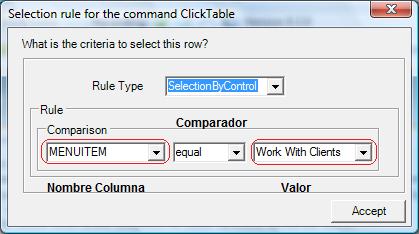
In the previous screen you can indicate in the "Rule Type" field if you want to select the row by the row number (SelectionByRow), in which case you should indicate the row number, or by the value of another column (SelectionByControl) in which case it will enable following screen:

In the SelectionByControl screen you may indicate the comparison to make to choose the row. In the window, three elements are displayed:
- Column name: is the name of the column to be used to compare, for example "product ID"
- Comparator: it is the comparison that is going to be used to select the row. In the example of the "product ID", the comparator = could be useful. However, if what you want is to select any product which has a positive balance, the comparator > might be more appropriate.
- Value: it is the value to compare with. This value can be a hardcoded value or variable. If variables are being used for the test case, they will be listed at the end of the combo.
Validations
Validations allow us to express what is the expected response of the system at any one time. So, if you press the button Imagen:buttonValidations.jpg a list of possible validations that can be done is presented. For example, if you want to validate the existence of a text on the screen, select it and then press the "Validation" button. Then you should select the validation AppearText and the system will indicate that validation has been added correctly.
If validations are on a text on the screen, that text must be selected before pressing the button validations. For validation in a grid you must indicate (as in the actions on the grid) the selection criteria which has been used to choose the row in the grid.
Variable Handling
Many times during the course of a test case it is necessary to take values returned by the system and then enter them in another part of the application. A typical example is when you create an invoice, then the system generates a unique invoice number and displays it on screen. Then if we need to make an query related with this bill we need to enter the invoice number. For such situations there are variables. A variable is simply a value that is associated with a name. In the example above we can assign the name of InvoiceNumber to the value 8993 of the bill.
Now, what is the advantage of using variables? The main advantage is that if we use directly the value returned by the time we recorded the test case (8993 in the example), when we try to run it, it wont work and it would look for 8993 invoice number again, instead of the one generated during the course of the execution of the test case. Conversely, if you use a variable to store the value returned by the application, the test case can run as many times as you want without any problem, dynamically obtaining the invoice number.
Well, now see that this can be done very simply. Following the example of the invoice number, what we should do when the system display the invoice number is select it and then press the button Imagen:buttonTake.jpg. At that time the system will ask the name you want to assign to that value, in this case it would be InvoiceNumber.
After, when you arrive at the screen of the query, directly enter the invoice number that was generated, in this case the 8993, and press "Check" (in the system under test). At the time the system realizes that you are entering a value that is stored as a variable, therefore asks the user to use the variable instead of directly using the supplied value. You have to confirm and it is ready! If you have forgotten the value of the variable that had saved you can use the variables button Imagen:buttonVariables.jpg.
Comment
Sometimes it is necessary to take some notes during the recording of the test case. These notes may have different purposes but are generally very helpful. For this reason we have added the button Imagen:buttonComments.jpg that lets you add comments anywhere in the test case and then will be deployed in line to where it was entered.
To use the functionality is very simple, when you were recording in the place you want to add the comment, just press the button Imagen:buttonComments.jpg and then enter the comment.
Summary
As we have seen throughout this page, GXtest Recorder lets you record the actions of a test case and add validations, variables and comments in a simple and intuitive way.