GXtest Generator User Manual
GXtest Generator is a tool designed to help us with the startup of a new test project in GXtest, in an automated fashion. GXtest Generator is a GeneXus extension, and can be installed along with GXtest or as a standalone tool. Using this extension, we can automatically generate test cases and test data with only one click.
Before we begin, we must have an installed and authorized GXtest copy somewhere in our local network (may be on anothe computer), where the test cases will be run (See GXtest Installation guide).
Contents |
Automated test case generation
This tool takes advantage of GeneXus abstraction levels trough transactions and work with patterns information (available in the Knowledge Base), to generate GXtest test cases and datapools in an automated fashion.
- Which functionalities are tested by the automatically generated test cases?
For each transaction in the Knowledge Base, a test case is generated to test the CRUD operations over the entity represented by the transaction: Create (insert), Retrieve (search), Update, and Delete.
For example, if we have the Client transaction in the KB, GXtest Generator will create a test case that inserts a new Client, then it searchs the new client in the "Work With" page, then updates some data about the client, and finally it will delete de created Client.
- How good or complex are the generated test cases?
Although the test cases are created to test the CRUD operations, the main purpose of this test cases is that the user can start with automated testing quickly, and not start from cero.
Also, these test cases can be edited, improved, or reused inside other more complex test cases.
- How can I see the generated test cases?
After the generation project is completed, all test cases and datapools are imported into a GXtest project named the same as the KB, and the suffix "_Auto".
Starting GXtest Generator in GeneXus
In GeneXus IDE, we can open GXtest Generator from the "GXtest" menu, by selecting the "Autogenerate TestCases" option.
In the window that opens up, we can see the existing project (if we already have one for this KB), or the button that allows us to start the generation process: "Generate tests".
If we need to, we may configure some aditional options in the extension configuration page, before we start the process.
Configuration Options
Inside GeneXus menu, in Tools -> Options, exists a section where all GXtest extensions are configured.
- In section General you can specify:
- Data Dictionary Path: The file path where dictionary data is loaded. An example is available here
- Include Unreferences Transactions: Sets whether all transactions and objects may be generated (True), or only transactions or pages called from any GeneXus Main object (False).
- Language: The lenguage in which the application is generated and tested. This is required in order to check the GeneXus automatic validation messages.
- Startup Test Case: an initial test case that will be included at the start of every generated test case. This becomes handy when you need to execute a step prior to the execution of all test cases, for example a login test case.
- Test depth: Sets the test depth of the generated test cases. See additional info in GXtest Generator - Test depth.
- Visit Web Pages: When set to True, it generates an additional test cases which visits every web page of the application. This becames usefull in order to check that all pages are correctly deployed in the test environment.
- Manager section
- Here you may configure the GXtest Manager schedule information about the generated test cases, in order to start unattended execution of the project tests.
- Connection section
- All the GXtest database connection-related data is configured, where the generated test cases and project will be saved.
- Advanced section:
- Temp XML path: the temporary folder where the generated test cases are stored, before they get imported into GXtest project. Also, this path is the location where the generation log file is saved.
- Update KB: It sets the update policy applied if the KB already exists in GXtest. If the KB must be always updated then you should choose Always Update. To update the KB objects only when no conflicts are raised (new objects only) select Update if no conflicts. Choose Never Update if you do not want to impact the KB changes into GXtest.
GXtest Generator Execution
While executing the generation process, details about completed steps will be shown in the grid, and also in the GeneXus output window. All analyzed objects, generated test cases and datapools will be displayed in the output.
Updating the generated test cases when the KB changes
GXtest Generator main purpose is to be executed one time only, in order to initialize and create the test project, to begin working with GXtest Designer, creating new test cases and improving the automatically generated ones.
However, some logic exists in the generator in order to allow us to automatically create new test cases when the KB has new objects, and we have already generated the test project in the past.
For each "Generate project" execution, every test case and test data is generated again. If the target project already exists, the new test cases will be imported, and the existing test cases and datapools will be overwritten with the new version of each, except when the following conditions are met:
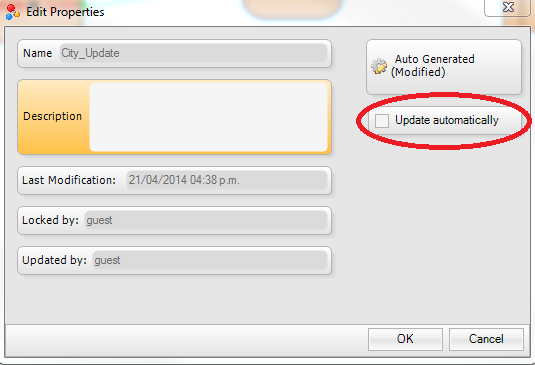
- The test case was manually updated in GXtest Designer, and the Update Automatically option is disabled (it becomes disabled automatically whenever we edit the automatically generated test case). This option is available in the test case properties window.
- The Datapool was manually updated in GXtest Designer (its columns or data), and the Update Automatically option is disabled (it becomes disabled automatically whenever we edit the automatically generated datapool or its data). This option is available in the datapool edition window.
