Difference between revisions of "ClickMenu Command"
(→ClickMenu in GXtest Recorder) |
|||
| Line 14: | Line 14: | ||
* PXToolsMenu | * PXToolsMenu | ||
| − | For all of the previously mentioned commands the ClickMenu may be employed | + | For all of the previously mentioned commands the ClickMenu may be employed. It will require the selection of the menu/sub-menu separated with the character defined. |
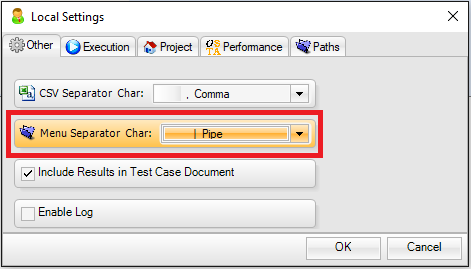
The menu separator character can be defined in GXtest Designer on the configuration window accesible through 'Options -> Local Settings... -> Other -> Menu Separator Char' as we can see below: | The menu separator character can be defined in GXtest Designer on the configuration window accesible through 'Options -> Local Settings... -> Other -> Menu Separator Char' as we can see below: | ||
Latest revision as of 19:49, 14 September 2017
The ClickMenu command is specifically employed in GxTest for the various and different types of menus which can be implemented with GeneXus, including some UserControls.
Some of the supported external menus are:
- JSCookMenu
- SmoothNavMenu
- PXToolsMenu
For all of the previously mentioned commands the ClickMenu may be employed. It will require the selection of the menu/sub-menu separated with the character defined.
The menu separator character can be defined in GXtest Designer on the configuration window accesible through 'Options -> Local Settings... -> Other -> Menu Separator Char' as we can see below:
The available options are:
- Slash ('/')
- Comma (',')
- Semicolon (';')
- Dot ('.')
- Pipe ('|')
- Colon (':')
- Number ('#')
For example if we choose the slash as the separator char, the ClickMenu command would look like this:
ClickMenu(Menu1, 'File/Save As/PDF File')
ClickMenu in GXtest Recorder
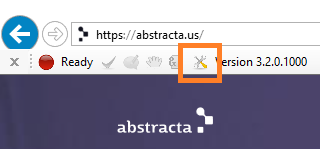
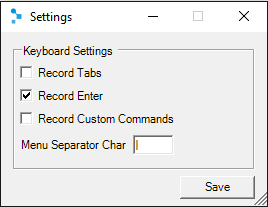
For record this command in GXtest Recorder, the menu separator char must be defined in "Record Settings"'s window.
The specified character must be the same that the character defined in GXtest Designer so, when you execute the test cases recorded by GXtest Recorder, they'll run properly.
Next, further information is provided about the menus which require additional information to work properly.
Additional Configuration
- PXToolsMenu
That menu is not natively supported throughout the recording of a test whilst using GXTest Recorder, nonetheless, it is possible both using it, as well as adding it, to GXTest Designer. Taking that into consideration, the selected path required for testing our application in the form of Menus/Sub-menus/Options can be ran.
The only one requirement, is unzipping and then importing this file into the KB of our applicaiton into GXtest, which contains the definition of the control for the menu, and a generic object. Once the import process is completed, the ClickMenu command may be employed against the object.control which was imported as follows:
In that example the option "Objects" is selected from within the menu "Tables"
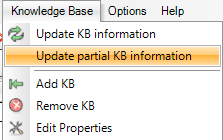
In order to import the file with the definition of the menu, you should go to the menu of Knowledge Base in GXTest Designer, and then pick the option "Update partial KB information"


