Difference between revisions of "変数を使用するテストケースの作成"
(Created page with "{{Idiomas| Crear un Caso de Prueba con Variables| Creating a Test Case with Variables| 変数を使用するテストケースの作成}} __NOTOC__ Category:GXtest Guides...") |
|||
| Line 3: | Line 3: | ||
[[Category:GXtest Guides]] | [[Category:GXtest Guides]] | ||
| − | == | + | == はじめに == |
| − | + | テストケースでは、アプリケーションから返された値を取得し、テストケースの別の部分で使用する必要が生じることがよくあります。 | |
| − | + | このような場合は、変数を使用できます。このチュートリアルでは DuplicateClient という例を作成します。このテストケースの目的は、複数のクライアントを同じ ID で登録できないようにすることです。このために、次の手順でテストケースを作成します: | |
| − | # | + | # [Work With Clients] ページに移動します |
| − | # | + | # リスト内の最初のクライアント ID を変数に読み込みます |
| − | # | + | # 新しいクライアントを作成するボタンをクリックします |
| − | # | + | # 読み込んだ値をクライアント ID として入力し、名前を入力します |
| − | # | + | # [承認] をクリックし、この ID がすでに存在することを通知するウィンドウがアプリケーションで開くことを確認します |
| − | == | + | == テストケースの作成 == |
| − | + | GXtest Designer と GXtest Recorder の操作手順を説明します。最初に、GXAjaxSample の作業を実施していた場所から GXAjaxSample9 プロジェクトを開き、GXtest Designer で「DuplicateClient」という新しいテストケースを記録するように指定します。Enter キーを押すと、ブラウザーウィンドウが開きます。開始ページで [Work With Clients] のリンクをクリックします。 | |
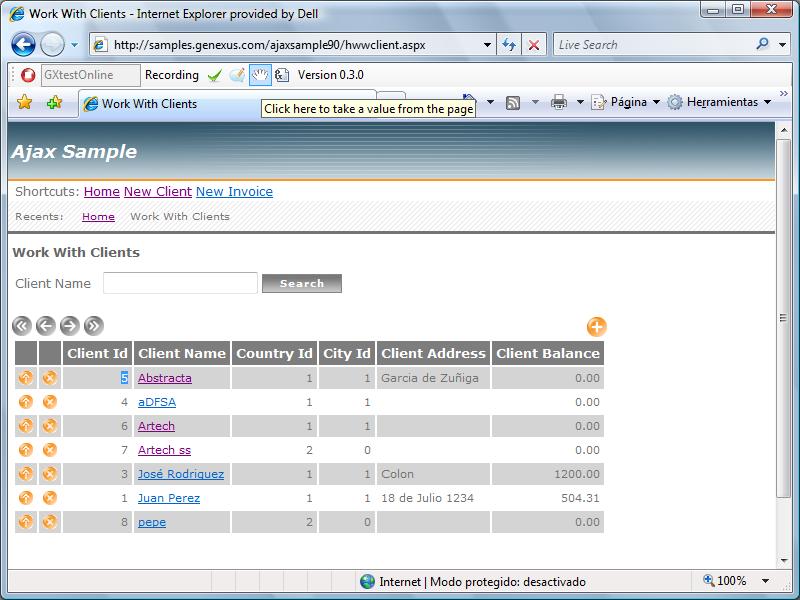
| − | + | 最初のクライアントの ID として返される値を取得する必要があります (この例では「5」)。次の図に示すように、マウスで値を選択し、 [[Image:ButtonTake.jpg]] ボタンをクリックします。 | |
[[Image:buttonTake2.jpg|center]] | [[Image:buttonTake2.jpg|center]] | ||
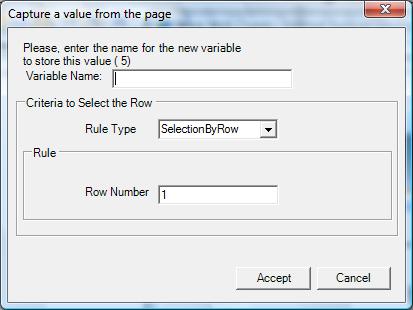
| − | + | クリックすると新しいウィンドウが開き、変数名と条件を入力できます。この例では変数名が ExistingClientId、条件は最初の行を選択することです (この例では、[By Row] の値は「1」のままにします)。 | |
[[Image:CaputreValueWindow.jpg||center]] | [[Image:CaputreValueWindow.jpg||center]] | ||
| − | + | 次に、[+] ボタンをクリックして新しいクライアントを入力します。画面が開いたら、ID のフィールドに値「5」を入力し、名前を入力します。[承認] をクリックしてクライアントを許可すると、次のウィンドウが表示されます: | |
[[Image:variableWindow.jpg|center]] | [[Image:variableWindow.jpg|center]] | ||
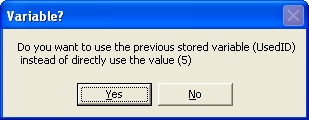
| − | + | このウィンドウには、固定値「5」ではなく保存された変数を使用するかどうかを確認するメッセージが表示されます。ここでは、このメッセージが表示されることを確認するのが目的なので、[はい] をクリックします。 | |
| − | + | [承認] ボタンをもう一度クリックすると、次のような警告が赤く表示されます:「レコードはすでに存在します」 | |
| − | + | 表示されるテキストを選択し、次のボタンをクリックして AppearText 検証を追加します: [[Image:ButtonValidations.jpg]]. | |
| − | + | ウィンドウを閉じて、記録を停止します。テストケースは、次のようになります: | |
[[Image:ClienteDuplicado1.jpg|center]] | [[Image:ClienteDuplicado1.jpg|center]] | ||
| − | + | Click "Insert" エッジラインを確認します。このエッジラインは GetValueTable コマンドを使用して、画面から取得する値と割り当てる名前を指定しています。 | |
| − | + | Client ノードを選択すると、FillInput コマンドで、定義済みの変数を指定していることが分かります。 | |
| − | == | + | == テストケースのテスト == |
| − | + | テストケースを実行し、同じ ID を繰り返し入力できないことを確認します。最初のクライアントを削除するテスト (記録時に使用したもの) がある場合、そのテストをもう一度実行すると、テストのデータがなくてもテストケースを正常に実行できることが分かります。 | |
Latest revision as of 17:44, 28 March 2014
はじめに
テストケースでは、アプリケーションから返された値を取得し、テストケースの別の部分で使用する必要が生じることがよくあります。 このような場合は、変数を使用できます。このチュートリアルでは DuplicateClient という例を作成します。このテストケースの目的は、複数のクライアントを同じ ID で登録できないようにすることです。このために、次の手順でテストケースを作成します:
- [Work With Clients] ページに移動します
- リスト内の最初のクライアント ID を変数に読み込みます
- 新しいクライアントを作成するボタンをクリックします
- 読み込んだ値をクライアント ID として入力し、名前を入力します
- [承認] をクリックし、この ID がすでに存在することを通知するウィンドウがアプリケーションで開くことを確認します
テストケースの作成
GXtest Designer と GXtest Recorder の操作手順を説明します。最初に、GXAjaxSample の作業を実施していた場所から GXAjaxSample9 プロジェクトを開き、GXtest Designer で「DuplicateClient」という新しいテストケースを記録するように指定します。Enter キーを押すと、ブラウザーウィンドウが開きます。開始ページで [Work With Clients] のリンクをクリックします。
最初のクライアントの ID として返される値を取得する必要があります (この例では「5」)。次の図に示すように、マウスで値を選択し、 ![]() ボタンをクリックします。
ボタンをクリックします。
クリックすると新しいウィンドウが開き、変数名と条件を入力できます。この例では変数名が ExistingClientId、条件は最初の行を選択することです (この例では、[By Row] の値は「1」のままにします)。
次に、[+] ボタンをクリックして新しいクライアントを入力します。画面が開いたら、ID のフィールドに値「5」を入力し、名前を入力します。[承認] をクリックしてクライアントを許可すると、次のウィンドウが表示されます:
このウィンドウには、固定値「5」ではなく保存された変数を使用するかどうかを確認するメッセージが表示されます。ここでは、このメッセージが表示されることを確認するのが目的なので、[はい] をクリックします。
[承認] ボタンをもう一度クリックすると、次のような警告が赤く表示されます:「レコードはすでに存在します」
表示されるテキストを選択し、次のボタンをクリックして AppearText 検証を追加します: ![]() .
.
ウィンドウを閉じて、記録を停止します。テストケースは、次のようになります:
Click "Insert" エッジラインを確認します。このエッジラインは GetValueTable コマンドを使用して、画面から取得する値と割り当てる名前を指定しています。
Client ノードを選択すると、FillInput コマンドで、定義済みの変数を指定していることが分かります。
テストケースのテスト
テストケースを実行し、同じ ID を繰り返し入力できないことを確認します。最初のクライアントを削除するテスト (記録時に使用したもの) がある場合、そのテストをもう一度実行すると、テストのデータがなくてもテストケースを正常に実行できることが分かります。


