Difference between revisions of "GXtest プロジェクト"
(Created page with "{{Idiomas |Proyectos GXtest |GXtest Projects }} category:GXtest Guides <- Previous | Index ...") |
Revision as of 19:43, 6 November 2013
3. Projects
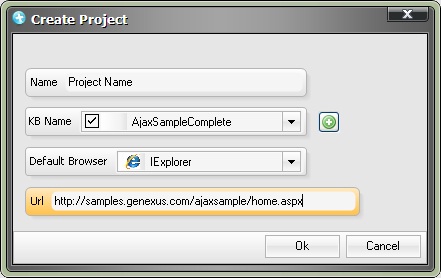
The first step to begin using GXtest is to create a project. To do this click on Project > New Project. In the new window you can specify the project’s properties.
- Name of the project
- The KBs associated with the project (see also how to import a GeneXus KB)
- Default Browser
- Default URL
The name entered will identify the project. The KBs (Knowledge Bases – GeneXus source code) are the applications to be tested. You can choose a several KBs when an application is made up of more than one for example applications that use GXportal o GXflow. A KB imported into GXtest can only be used in one project and cannot be shared. The default browser that will be used (this version allows you just to use Internet Explorer). The default URL has two functions:
- First it is used when you begin to record a Test Case, the browser will suggest this URL.
- Second, if a Test Case uses the variable urlHome, (which will be used in tasks done by GXtest Manager), the default URL will be used for this variable. For more information about this property in GXtest Manager see the GXtest Manager Manual.
You can open a project by going to Project > Open Project. If you decide to delete the open project, go to Project > Delete Project. Remember that this will not delete the KBs associated with the project.
Exporting and Importing a project
GXtest allows you to export all the Test Cases of a project and its Data Pools. This allows you to duplicate a project if it is necessary. It is important to remember that the export will not export the KBs associated with the project. In order to duplicate a project you must export it and then import it using the following steps:
- To export a project go to Project > Import & Export > Export Project. Here you can choose the project to be exported and where you would like to export the file that contains the exported project. GXtest then opens a new window displaying the test cases and Data Pools that were exported.
- Creating a new project: Create a project and associate it with the same KBs as the project exported in step 1.
- To import the project go to Project > Import & Export > Import Project and select the project created in step 2. GXtest will then ask you to choose the ZIP file that contains the data from the project exported in step 1. When finished, GXtest will display the results of the import.
Back to GXtest Designer ユーザーズマニュアル
