Difference between revisions of "Creating a Test Case with Variables"
| Line 13: | Line 13: | ||
== Creating the Test Case == | == Creating the Test Case == | ||
Now you'll see the steps to be followed in GXtest Designer and GXtest Recorder. First open the GXAjaxSample9 project from where you were working with GXAjaxSample and tell GXtest Designer that you want to record a new Test Case that will be called DuplicateClient. Then press Enter which will open a browser window. Once you are on the Start page, click on the Work With Clients link. | Now you'll see the steps to be followed in GXtest Designer and GXtest Recorder. First open the GXAjaxSample9 project from where you were working with GXAjaxSample and tell GXtest Designer that you want to record a new Test Case that will be called DuplicateClient. Then press Enter which will open a browser window. Once you are on the Start page, click on the Work With Clients link. | ||
| − | Now you need to get the value returned for the ID of the first client (in this case 5) by selecting it with the mouse and then clicking on the button [[ | + | Now you need to get the value returned for the ID of the first client (in this case 5) by selecting it with the mouse and then clicking on the button [[Image:ButtonTake.jpg]] as seen in the following image: |
| − | [[ | + | [[Image:buttonTake2.jpg|center]] |
Upon clicking, a new window will appear where you can enter the name of the variable (in this case ExistingClientId) and the criteria that says you want the first row (in this case you will leave the ByRow value as 1). | Upon clicking, a new window will appear where you can enter the name of the variable (in this case ExistingClientId) and the criteria that says you want the first row (in this case you will leave the ByRow value as 1). | ||
| − | [[ | + | [[Image:CaputreValueWindow.jpg||center]] |
Then click the + Button to enter a new client. Once the screen opens put 5 as the value in the ID field and enter a name. Now click Accept to discharge the client and open the following window: | Then click the + Button to enter a new client. Once the screen opens put 5 as the value in the ID field and enter a name. Now click Accept to discharge the client and open the following window: | ||
| − | [[ | + | [[Image:variableWindow.jpg|center]] |
This window asks you if you want to user the saved value instead of the fixed value of 5. In the case this is exactly what you want to happen so click Yes. | This window asks you if you want to user the saved value instead of the fixed value of 5. In the case this is exactly what you want to happen so click Yes. | ||
| Line 29: | Line 29: | ||
Click the Accept button again on the discharge screen and a red warning that says: "Record already exists" | Click the Accept button again on the discharge screen and a red warning that says: "Record already exists" | ||
| − | Select the text that appears and add an AppearText validation by clicking the button [[ | + | Select the text that appears and add an AppearText validation by clicking the button [[Image:ButtonValidations.jpg]]. |
Then close the window to stop recording. The Test Case that you obtain ought to look like the following: | Then close the window to stop recording. The Test Case that you obtain ought to look like the following: | ||
| − | [[ | + | [[Image:ClienteDuplicado1.jpg|center]] |
Looking at the Click “Insert” Edge Line, it is using the GetValueTable command to indicate the value that it ought to take form the screen and the name that it ought to assign. | Looking at the Click “Insert” Edge Line, it is using the GetValueTable command to indicate the value that it ought to take form the screen and the name that it ought to assign. | ||
Revision as of 22:55, 19 March 2010
Introduction
Sometimes it is necessary to take values returned from an application and use them in a different part of a Test Case. To accomplish this you can use variables. In this tutorial you will create an example called DuplicateClient. The Test Case's objective is that no two clients are allowed to enter with the same ID. This can be done be making a Test Case using the following steps:
- Go to the Work With Clients Page.
- Load into the variable the ID of the first client on the list
- Click the button that allows you to create a new client
- Enter the value captured before for ID of the client and then enter a name
- Click Accept and make sure that the application brings up a window that says that this ID already exists
Creating the Test Case
Now you'll see the steps to be followed in GXtest Designer and GXtest Recorder. First open the GXAjaxSample9 project from where you were working with GXAjaxSample and tell GXtest Designer that you want to record a new Test Case that will be called DuplicateClient. Then press Enter which will open a browser window. Once you are on the Start page, click on the Work With Clients link.
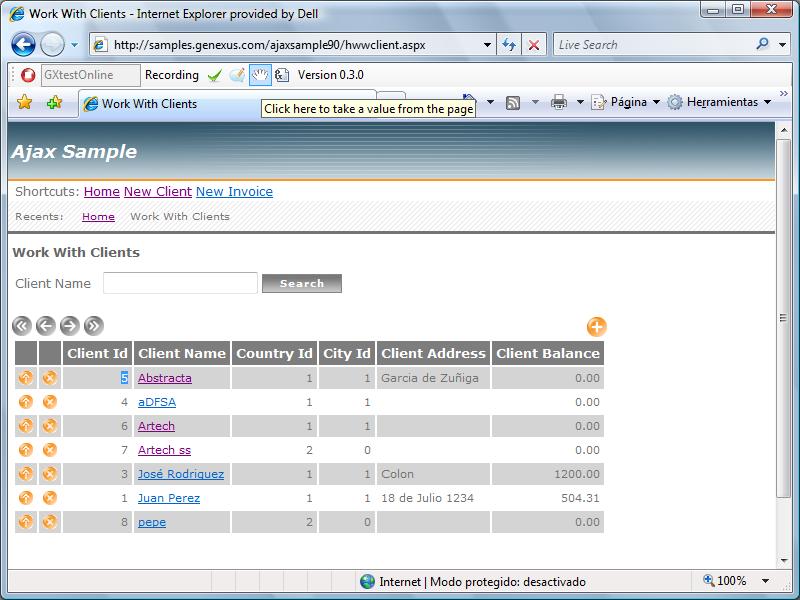
Now you need to get the value returned for the ID of the first client (in this case 5) by selecting it with the mouse and then clicking on the button ![]() as seen in the following image:
as seen in the following image:
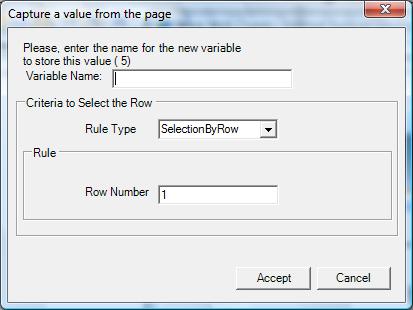
Upon clicking, a new window will appear where you can enter the name of the variable (in this case ExistingClientId) and the criteria that says you want the first row (in this case you will leave the ByRow value as 1).
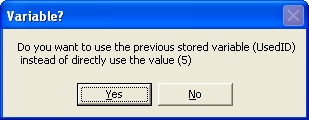
Then click the + Button to enter a new client. Once the screen opens put 5 as the value in the ID field and enter a name. Now click Accept to discharge the client and open the following window:
This window asks you if you want to user the saved value instead of the fixed value of 5. In the case this is exactly what you want to happen so click Yes.
Click the Accept button again on the discharge screen and a red warning that says: "Record already exists"
Select the text that appears and add an AppearText validation by clicking the button ![]() .
.
Then close the window to stop recording. The Test Case that you obtain ought to look like the following:
Looking at the Click “Insert” Edge Line, it is using the GetValueTable command to indicate the value that it ought to take form the screen and the name that it ought to assign.
Then if you select the Client Node you can see that the FillInput command goes to the pre-defined variable.
Testing the Test Case
Now you can run the Test Case and see that the system doesn’t allow you to enter repeated IDs. If you have the test to delete the first client (the one you used when recording) and run the test again you will see that the Test Case still works even though the data from the test are not there.


