Difference between revisions of "スマートデバイス用のテストケースの作成"
(Created page with "{{Idiomas|Crear un caso de prueba para Smart Devices|Creating a test case for Smart Devices| スマートデバイス用のテストケースの作成}} スマートデバイ...") |
(→Create a new test case for Smart Devices) |
||
| Line 15: | Line 15: | ||
| − | == | + | == スマートデバイス用の新規テストケースの作成 == |
| − | + | テストケースの設計を始める前に、モバイルアプリケーションで会社を新規作成する手順を手動で実行することをお勧めします。そうすれば、後で GXtest を使って自動化するプロセスおよび手順が分かります。GXtest Designer からエミュレーター/デバイスでアプリケーションを実行するには、ツールバーおよび [スマートデバイス] メニューにある [デバイスでアプリケーションを起動する] ボタンをクリックします。新しい会社を追加するには、メイン アプリケーション メニューから [Work With Devices Company] オプションを選択して [追加] ボタンをタップします。会社名を入力して [保存] をタップします。CompanyList に戻ります。作成した会社がリストに表示されているはずです。 | |
| − | + | 新規テストケースの作成を開始するために、メニューから [テストケース] -> [新規] を選択します。 | |
[[File:CreateNewSDTC.PNG|center]] | [[File:CreateNewSDTC.PNG|center]] | ||
| − | + | 名前を決定する際に、テストケースのメインプラットフォームも指定する必要があります。この場合は [スマートデバイス] を選択します。 | |
| − | + | これで新しい空のテストケースができたので、新しい SDPage を [オブジェクト] ツールバーからドラッグ アンド ドロップします。この SDPage はアプリケーションの実行を開始するときに表示される最初の画面を表し、Menu という GeneXus オブジェクトと一致します。テストケースに SDPage ができたら、この SDPage をダブルクリックし、オブジェクト セレクター ウィンドウから Menu オブジェクトを選択します。 | |
| − | + | 次に、スタートノードを Menu SDPage に接続する必要があります。接続するには、矢印をドラッグします。アプリケーションを実行するために Go コマンドを追加する必要があります。Web テストケースにおいて、新しい URL でブラウザを開くために行ったのと同様です。スマートデバイスのテストケースでは、Go コマンドによりデバイスまたはエミュレーターでアプリケーションがインストール/起動されます。したがって、最初の矢印に Go コマンドを追加し、値パラメーターとして、コンピューター内にある Android アプリケーションの apk ファイルへのパスを指定します。幸いなことに、このパスは [[Android での実行要件]]で &apkPath 変数にロード済みです。 | |
[[File:GoApkPath.png | center]] | [[File:GoApkPath.png | center]] | ||
| − | + | この時点で、選択されたエミュレーター/デバイスでアプリケーションが起動するかどうかを確認するために、テストケースをこのままの状態で実行します。 | |
| − | + | それでは、テストケースの設計を続行します。新しいコマンド TapText を Menu SDPage に追加します。このコマンドは [Work With Devices Company] というメニュー項目をタップします (したがって、TapText("Work With Devices Company") が必要)。このタップにより CompanyList ページに移動するので、GeneXus オブジェクトの CompanyList に関連付けられたもう 1 つ別の SDPage を追加し、このページに Menu SDPage を新しい矢印で接続する必要があります。 | |
| − | + | CompanyList ページに移動したら、[追加] ボタンをタップして新しい会社を作成します。したがって、CompanyList に関連付けられた SDPage 上で、このボタンに新しい Tap コマンドを追加します。コマンドは、次のようになります:Tap(CompanyList.ButtonInsert) | |
| − | + | 次に、会社の作成/編集/更新を行うための画面となる新しい SDPage を作成します。このページは GeneXus オブジェクトの CompanyGeneralSection です。このオブジェクトを SDPage に割り当て、CompanyList ノードをこのページに接続します。 | |
| − | + | 最後に、最後の SDPage (CompanyGeneralSection) で新しい会社の名前を入力したら (「My Company」など)、[保存] ボタンを押します。 | |
[[File:TCAddCompany.png | center]] | [[File:TCAddCompany.png | center]] | ||
| − | + | この最後の 2 つの手順を自動化するには、CompanyGeneralSection SDPage に次のコマンドを追加します。 | |
* FillInput(CompanyGeneralSection.CompanyName, "My Company") | * FillInput(CompanyGeneralSection.CompanyName, "My Company") | ||
* Tap(CompanyGeneralSection.ButtonSave) | * Tap(CompanyGeneralSection.ButtonSave) | ||
| − | + | ||
| + | 新しい会社の作成手順はこれで終了ですが、このテストケースで会社の登録が成功しているかどうかを確認することをお勧めします。そこで、CompanyList オブジェクトに関連付けられた SDPage を最後に 1 つ追加し、新しい会社の保存後にこのページが表示されるようにします。この最後のページには、新しい会社 ("My Company") がリストに表示されるかどうかを確認する検証を追加します。それには AppearText("My Company") コマンドを使用します。 | ||
| Line 61: | Line 62: | ||
| − | + | テストケースを実行し、最後の検証を含むすべての手順が正常に終了することを確認します。 | |
| + | |||
| + | |||
| + | これで最初のテストケースができあがりました。このテスト ケース フローで使用した固定値を変更し、代わりに[[データプールの使用 | データプール]]を使用することもできます。そうすればこのテストケースの管理が容易になり、新しいデータを使って拡張しやすくなります。 | ||
| + | |||
| + | |||
| + | == このテストケースを Web に拡張する == | ||
| + | |||
| + | ハイブリッドなテストケースの作成も可能です。つまり、テストケースの一部の手順をモバイルデバイス上で実行し、残りの手順を Web アプリケーション上で実行する (順序は任意) ということです。たとえば、スマートデバイスのアプリケーションで新しい会社を作成した後に、Web バージョンのアプリケーションでその会社が表示されるかどうかを確認したい場合があります。 | ||
| + | |||
| + | このようなテストケースを作成するには、一方のプラットフォームで手順を自動化するテストケースを、一度に両方とも使用する必要があります。たとえば、Web 上で "My Company" を検索する Web テストケースがすでにあり、Android アプリケーションで新しい会社を追加するためのテストケースもすでに作成されているとします。 | ||
| + | その場合、これら両方のテストケースを 3 個目のテストケースの中に入れ、それらを以下のように矢印で接続するだけで完成します。 | ||
| − | + | [[File:MixedTC.PNG|center]] | |
== Extending the test case to the Web == | == Extending the test case to the Web == | ||
Revision as of 20:25, 29 May 2015
スマートデバイス用の最初の GXtest テストケースの作成には、アプリケーションの作成で作成した GeneXus サンプル Android アプリケーションを使用します。 このサンプルアプリケーションは、顧客および会社の情報を保存する非常に単純なアプリケーションです。
ここでは、新しい会社を追加し、その会社がアプリケーションデータに実際に追加されたかどうかを確認するテストケースを新規作成します。
Contents |
前提条件
まず最初に、テスト対象となる Android アプリケーションを生成する必要があります。したがって、前述の GeneXus チュートリアルを完了する必要があります。
その次に、エミュレーターまたは実際のデバイスでAndroid での実行要件が満たされていることを確認します。
また、GXtest プロジェクトの作成とプロジェクト用 KB のセットアップもすでに完了しているものとします。追加情報については、GXtest プロジェクトおよびGXtest および GeneXus KBの記事を参照してください。
スマートデバイス用の新規テストケースの作成
テストケースの設計を始める前に、モバイルアプリケーションで会社を新規作成する手順を手動で実行することをお勧めします。そうすれば、後で GXtest を使って自動化するプロセスおよび手順が分かります。GXtest Designer からエミュレーター/デバイスでアプリケーションを実行するには、ツールバーおよび [スマートデバイス] メニューにある [デバイスでアプリケーションを起動する] ボタンをクリックします。新しい会社を追加するには、メイン アプリケーション メニューから [Work With Devices Company] オプションを選択して [追加] ボタンをタップします。会社名を入力して [保存] をタップします。CompanyList に戻ります。作成した会社がリストに表示されているはずです。
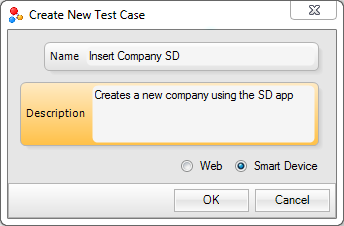
新規テストケースの作成を開始するために、メニューから [テストケース] -> [新規] を選択します。
名前を決定する際に、テストケースのメインプラットフォームも指定する必要があります。この場合は [スマートデバイス] を選択します。
これで新しい空のテストケースができたので、新しい SDPage を [オブジェクト] ツールバーからドラッグ アンド ドロップします。この SDPage はアプリケーションの実行を開始するときに表示される最初の画面を表し、Menu という GeneXus オブジェクトと一致します。テストケースに SDPage ができたら、この SDPage をダブルクリックし、オブジェクト セレクター ウィンドウから Menu オブジェクトを選択します。
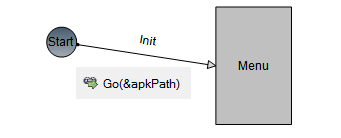
次に、スタートノードを Menu SDPage に接続する必要があります。接続するには、矢印をドラッグします。アプリケーションを実行するために Go コマンドを追加する必要があります。Web テストケースにおいて、新しい URL でブラウザを開くために行ったのと同様です。スマートデバイスのテストケースでは、Go コマンドによりデバイスまたはエミュレーターでアプリケーションがインストール/起動されます。したがって、最初の矢印に Go コマンドを追加し、値パラメーターとして、コンピューター内にある Android アプリケーションの apk ファイルへのパスを指定します。幸いなことに、このパスは Android での実行要件で &apkPath 変数にロード済みです。
この時点で、選択されたエミュレーター/デバイスでアプリケーションが起動するかどうかを確認するために、テストケースをこのままの状態で実行します。
それでは、テストケースの設計を続行します。新しいコマンド TapText を Menu SDPage に追加します。このコマンドは [Work With Devices Company] というメニュー項目をタップします (したがって、TapText("Work With Devices Company") が必要)。このタップにより CompanyList ページに移動するので、GeneXus オブジェクトの CompanyList に関連付けられたもう 1 つ別の SDPage を追加し、このページに Menu SDPage を新しい矢印で接続する必要があります。
CompanyList ページに移動したら、[追加] ボタンをタップして新しい会社を作成します。したがって、CompanyList に関連付けられた SDPage 上で、このボタンに新しい Tap コマンドを追加します。コマンドは、次のようになります:Tap(CompanyList.ButtonInsert)
次に、会社の作成/編集/更新を行うための画面となる新しい SDPage を作成します。このページは GeneXus オブジェクトの CompanyGeneralSection です。このオブジェクトを SDPage に割り当て、CompanyList ノードをこのページに接続します。
最後に、最後の SDPage (CompanyGeneralSection) で新しい会社の名前を入力したら (「My Company」など)、[保存] ボタンを押します。
この最後の 2 つの手順を自動化するには、CompanyGeneralSection SDPage に次のコマンドを追加します。
- FillInput(CompanyGeneralSection.CompanyName, "My Company")
- Tap(CompanyGeneralSection.ButtonSave)
新しい会社の作成手順はこれで終了ですが、このテストケースで会社の登録が成功しているかどうかを確認することをお勧めします。そこで、CompanyList オブジェクトに関連付けられた SDPage を最後に 1 つ追加し、新しい会社の保存後にこのページが表示されるようにします。この最後のページには、新しい会社 ("My Company") がリストに表示されるかどうかを確認する検証を追加します。それには AppearText("My Company") コマンドを使用します。
テストケースを実行し、最後の検証を含むすべての手順が正常に終了することを確認します。
これで最初のテストケースができあがりました。このテスト ケース フローで使用した固定値を変更し、代わりに データプールを使用することもできます。そうすればこのテストケースの管理が容易になり、新しいデータを使って拡張しやすくなります。
このテストケースを Web に拡張する
ハイブリッドなテストケースの作成も可能です。つまり、テストケースの一部の手順をモバイルデバイス上で実行し、残りの手順を Web アプリケーション上で実行する (順序は任意) ということです。たとえば、スマートデバイスのアプリケーションで新しい会社を作成した後に、Web バージョンのアプリケーションでその会社が表示されるかどうかを確認したい場合があります。
このようなテストケースを作成するには、一方のプラットフォームで手順を自動化するテストケースを、一度に両方とも使用する必要があります。たとえば、Web 上で "My Company" を検索する Web テストケースがすでにあり、Android アプリケーションで新しい会社を追加するためのテストケースもすでに作成されているとします。
その場合、これら両方のテストケースを 3 個目のテストケースの中に入れ、それらを以下のように矢印で接続するだけで完成します。
Extending the test case to the Web
Is is possible to create an hybrid test case, which means that the test case can execute some steps on a mobile device, and other steps oven the Web application (in any order). For example, we may need to check on the Web version of the application if the new company appears, after we created it on the Smart device app.
To create this kind of test cases, we should include the test cases that automate the steps in one platform at a time. For example, suppose we already have a Web test case that searches "My Company" on the Web, and also the test case we already created for adding a new company on the Android app.
So, we only need to include both test cases in a third test case, connecting them through an edge, like this:


