Difference between revisions of "GXtest Generator Tutorial"
| Line 24: | Line 24: | ||
| − | Clicking on the button | + | Clicking on the button will start the process for automatic generation, and the progress will be displayed on screen. |
| − | Once the process is completed, a project will be created in GXTest with its corresponding KB, and it will import all of the automatically generated test cases | + | Once the process is completed, a project will be created in GXTest with its corresponding KB, and it will import all of the automatically generated test cases. |
The automatically generated test cases cover two types of tests: | The automatically generated test cases cover two types of tests: | ||
| Line 35: | Line 35: | ||
| − | * | + | * For every WebPanel that is not self-generated(*), a basic test case will be generated insert input values in all of the editable fields, as well as pressing all of the buttons. |
| − | (*) | + | (*) The self-generated webpanels are those which are generated by GeneXus in an automatic manner. An example for this concept are prompts and the screens of the WorkWith patterns. |
| − | + | Should you look for further information about automatic generation of test, then please visit [[Manual de Usuario de GXtest Generator]]. | |
| − | == | + | == Step 2: Execution of the generated tests == |
| − | + | Once the automatic generation is completed, in GXTest Designer the project can be seen, as well as the test cases which were generated. | |
| − | + | After opening GXTest Designer, proceed to open the project by going to 'Project -> Open Project', then selecting the generated project with the name of the KB and its suffix "_Auto". | |
| − | + | For example, for the AjaxSample KB, the name of the automatically generated project will be AjaxSample_Auto. | |
| − | + | In the tree from the right the generated test cases, as well as those which were imported can be seen: | |
[[Image: Tctree.PNG|center]] | [[Image: Tctree.PNG|center]] | ||
| − | + | Everything has been generated in an automatic manner starting by the click performed in GeneXus. | |
| − | + | In the KB employed for the example (AjaxSample), the entities for which test cases we generated are City, Client, Country, Invoice and Product. | |
| − | + | For every single one of those entities, a main test case was created (for example City), as well as other secondary test cases which perform several other operations (such as 'Creation': City_Insert, 'Deletion': City_Delete, etc.), the latter tests are employed by the former one. | |
| − | + | This example portrays what a test case for City would look like (it creates, searches, visualizes, modifies and deletes a City). | |
[[Image: TCMain.PNG|center]] | [[Image: TCMain.PNG|center]] | ||
| − | + | Having the test case opened, we can run it from the browser itself, by clicking the Run button (or Shift + F5) which can be found in the tools bar: | |
[[Image:ejecutar.JPG|center]] | [[Image:ejecutar.JPG|center]] | ||
| − | + | That action will trigger the opening of the browser, as well as the beginning of the execution of actions contained in the tests' definition. | |
| − | + | ||
| − | + | ||
| + | In the following image are displayed what the results of the tests look like in GXTest: | ||
[[Image: resultadosVerCliente.JPG|center]] | [[Image: resultadosVerCliente.JPG|center]] | ||
Revision as of 01:40, 30 July 2013
In order to start automating with GXTest, Para empezar a automatizar con GXtest, a point to make is that it is possible to initialise the project as well as the KB in an automatic manner.
Employing the GXTest Generator's extension for Genexus (which must be version Evolution 1 or greater), some tools will become available which will be useful whilst working with the KB and GXTest from Genexus itself.
GXTest Generator aids you through the beginning of tests automation with GXTest, automatically generating test cases and initialising the work environment for GXTest.
Provided the extension is not yet installed in Genexus, you can either check step 3 from Guias_de_Instalacion in GXTest, or download the extension from GeneXus Marketplace.
So that you can go through this tutorial, GXTest Designer must be installed in your system (Check Guias_de_Instalacion) In the examples below the following KB is employed [AjaxSample] from the samples by GeneXus.
Contents |
Step 1: Automatic Initialization
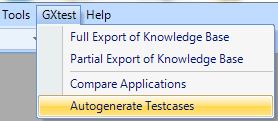
While opening GeneXus, a new menu labeled GXTest will be displayed which, will have an item for Autogenerate TestCases. That menu option will open up the window for automatic generation from GCTest Generator.
In that location it's where the information for testing associated to the KB that is opened will be displayed, and also, the button to start the process for Generate tests will be available.
Should it be necessary, before starting with the generation of test cases, it is possible to set the options that the extension provides (Refer to Generación automática: GXtest Generator#Opciones de Configuración), nonetheless, the default options will now suffice.
Clicking on the button will start the process for automatic generation, and the progress will be displayed on screen.
Once the process is completed, a project will be created in GXTest with its corresponding KB, and it will import all of the automatically generated test cases.
The automatically generated test cases cover two types of tests:
- For every transaction, a test case will be generated which will test from an entity its creation, search, visualisation, update and delete.
For examplo, in case I happened to have a transaction Product in the KB, a set of test cases would be automatically generated following this workflow:
- For every WebPanel that is not self-generated(*), a basic test case will be generated insert input values in all of the editable fields, as well as pressing all of the buttons.
(*) The self-generated webpanels are those which are generated by GeneXus in an automatic manner. An example for this concept are prompts and the screens of the WorkWith patterns.
Should you look for further information about automatic generation of test, then please visit Manual de Usuario de GXtest Generator.
Step 2: Execution of the generated tests
Once the automatic generation is completed, in GXTest Designer the project can be seen, as well as the test cases which were generated. After opening GXTest Designer, proceed to open the project by going to 'Project -> Open Project', then selecting the generated project with the name of the KB and its suffix "_Auto". For example, for the AjaxSample KB, the name of the automatically generated project will be AjaxSample_Auto.
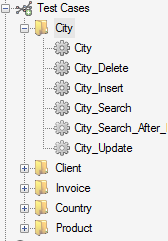
In the tree from the right the generated test cases, as well as those which were imported can be seen:
Everything has been generated in an automatic manner starting by the click performed in GeneXus.
In the KB employed for the example (AjaxSample), the entities for which test cases we generated are City, Client, Country, Invoice and Product. For every single one of those entities, a main test case was created (for example City), as well as other secondary test cases which perform several other operations (such as 'Creation': City_Insert, 'Deletion': City_Delete, etc.), the latter tests are employed by the former one.
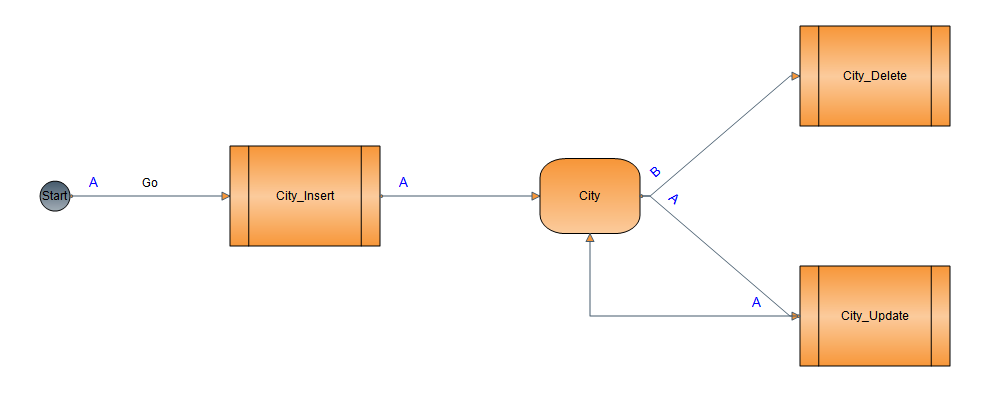
This example portrays what a test case for City would look like (it creates, searches, visualizes, modifies and deletes a City).
Having the test case opened, we can run it from the browser itself, by clicking the Run button (or Shift + F5) which can be found in the tools bar:
That action will trigger the opening of the browser, as well as the beginning of the execution of actions contained in the tests' definition.
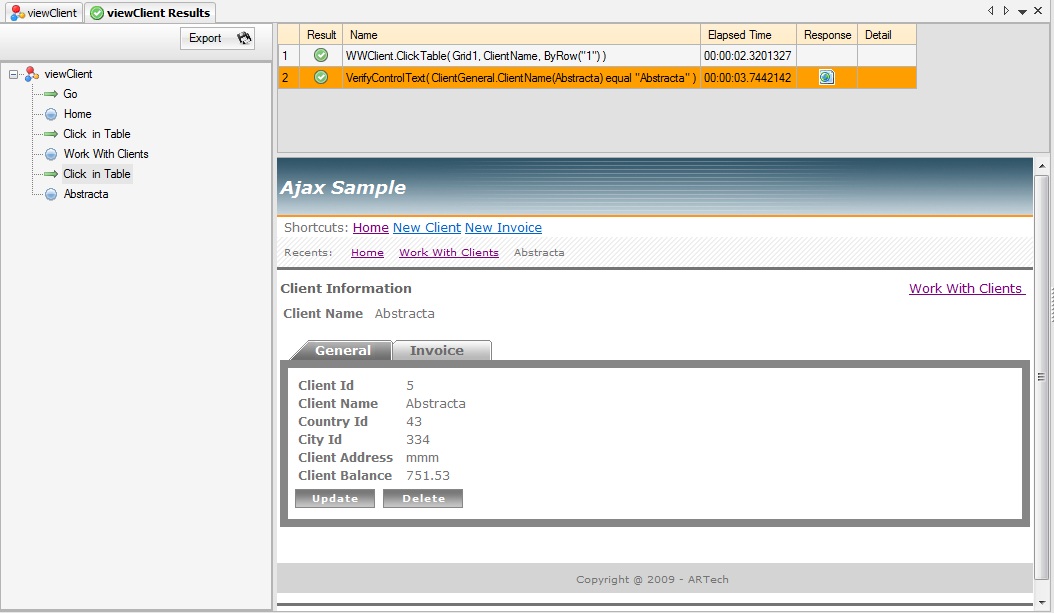
In the following image are displayed what the results of the tests look like in GXTest:
Paso 3: Agregar o modificar los datos
Crear un nuevo caso de prueba
A partir de aquí se tiene el entorno de trabajo de GXtest inicializado, y es posible seguir agregando nuevos casos de prueba o reutilizando los ya creados.
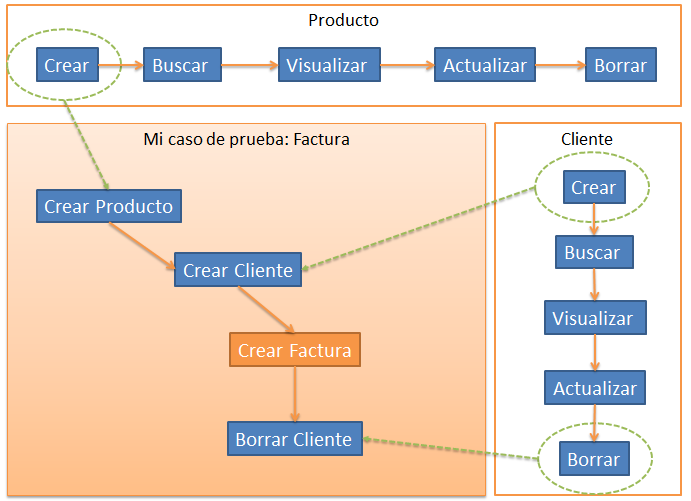
Por ejemplo, puede ser interesante crear un caso de prueba mas complejo que genere un nuevo producto, luego un nuevo cliente, una factura para ese cliente y ese producto, y luego intentar borrar el cliente.
Si quisiera generar este caso de prueba complejo, puedo reutilizar los casos de prueba ya generados de forma automática para cada uno de esos pasos, e incluirlos en un único caso de prueba.
Para esto, puede crear un nuevo caso de prueba en el menú "Test Cases" -> New. Luego ingresar el nombre del caso de prueba, por ejemplo "Factura".
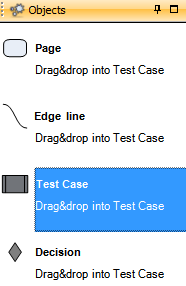
Para incluir los casos de prueba ya generados y utilizarlos dentro de "Factura", puede arrastrar de la barra de objetos un caso de prueba al nuevo caso de prueba en blanco.
Aparecerá una ventana para seleccionar el caso de prueba que se desea incluir. Escribir Client_Insert en el filtro y seleccionarlo cuando aparezca en la grilla. Realizar lo mismo con el resto de los casos de prueba (Product_Insert, etc).
Por último, es necesario conectarlos con aristas de forma de completar el flujo mostrado en el ejemplo.
Listo. El caso de prueba está listo para ser ejecutado.
Como seguir?
Es recomendable continuar el tutorial en Empezando con GXtest para completar el proyecto, y por ejemplo grabar un caso de prueba utilizando el navegador.
