Difference between revisions of "GXtest Manager User's Manual"
(→Tasks definition) |
(→Tasks definition) |
||
| Line 108: | Line 108: | ||
By creating the Task we also have to associate it with an Executor where the Task will be executed, and for this we have to create previously the Executor instance in GXtest Manager, indicating IP and Port to connect. | By creating the Task we also have to associate it with an Executor where the Task will be executed, and for this we have to create previously the Executor instance in GXtest Manager, indicating IP and Port to connect. | ||
| + | |||
| + | [[image:ViewTask.PNG|center]] | ||
There are three types of loops to define the tasks: | There are three types of loops to define the tasks: | ||
| Line 121: | Line 123: | ||
We also need to indicate the '''Environment''' to use. This provides the Task certain information to run related with the execution environment of the application under test. | We also need to indicate the '''Environment''' to use. This provides the Task certain information to run related with the execution environment of the application under test. | ||
| − | |||
| − | |||
=== Import & Export Tasks === | === Import & Export Tasks === | ||
Revision as of 16:40, 5 December 2011
This page shows the main concepts of GXtest Manager.
Contents |
Introduction
GXtest Manager allows you to group the test cases modeled with GXtest Designer, and schedule them for execution. Then it lets you see the results of each of these executions.
For this, consider certain fundamental concepts:
TestCase: This is a test case generated with Gxtest Designer. It consists of a series of steps to execute on the application under test, with certain data and certain expected results.
Suite: is a collection of Test Cases (within the same project). Optionally, you can define an execution order for the Test Cases and the number of times that each of them will run. See also Creating a Suite.
To visualize this consider the following example:
| Suite 1 | |
|---|---|
| Test case 1 | 5 |
| Test case 2 | 15 |
| Test case 3 | 4 |
In this case the suite 1 includes three test cases, the first one execute 5 times, after the end of that execution will run the test case 2 exactly 15 times and finally the test case 3 is executed 4 times.
Task: is a set of scheduled suites in a fixed time for execution. They can be scheduled in different modes (single time, daily, weekly).
Executor: machine to conduct the execution of a Task, which must have GXtest Executor installed. This component allows you to run tests parallely and in different environments, because we can schedule various tests (other tasks) on different machines.
At the start page of GXtest Manager, not only users are listed, but also the projects that we created previously using Gxtest Designer.
Each project will have its own Test Cases, Suites, and Tasks, so once selected the project in which we are going to work, will only appear the Test Cases, Suites and Tasks associated with it.
After choosing the project and the user you will see that certain menu options are now available.
Configurations
Users
GXtest Manager allows you to define users. The main reason for defining users is to associate them with Suites and Tasks, to receive an email with a summary of the results after each run.
Executors
The test execution is performed in a distributed way on each machine that has installed the GXtest Executor. This is an application that listens expecting to be directed to execute a task. To perform executions over these distributed components is necessary to create them in GXtest Manager, giving them a name and indicating the IP and Port where they listen.
When you install GXtest Manager it includes a predefined Executor for local executions in the default port 6681.
You should see also GXtest Executor User's Manual.
Environments
You can define the parameters that the Task should receive to run.
This includes the URL where the Test Cases will execute, which is what defines our system under test. This parameter will be loaded to run on the Executor in the URLhome variable in each Test Case.
You can also define the DBMS used by the application, in order to register this data in the results and then it could be used (in the future) as a further dimension to statistics.
You can also configure a set of Datapools to be filled before the execution of the execution of the Task. This is useful if the data to use in the Datapool is dependent on application state, and is required to load immediately prior to the execution and use of this data. This functionality is not yet complete.
In addition, you can define a bat file to invoke prior to the execution of the Task, so in this bat file you could prepare the state of the application to test. This can include things like restore the state of the database from a previous backup, run SQL scripts, copy files, etc.. This functionality is not yet complete.
Options
In that menu you can define the general configuration.
SMTP You need to configure the SMTP server in order to let GXtest Manager to sends the emails with the results. You must indicate:
- SMTP Host
- SMTP Port
- SMTP User
- SMTP Password
Also the variable URLExec must be configured. This is setted in the installation, and gives you access to the Executor to the component that sends the emails. We suggest to keep that value as it appears by default.
Example:
http://abstracta00/GXTestManager/aprocessexecutionresult.aspx
Logging
You can define if you want to activate the log, and the directory where the GXtest Manager saves the log. If not defined the route is saved in the same directory where the application is deployed. We suggest to keep this value in "NO", unless for debugging propouses.
Browsers, DBMS, Operative Systems
It is necessary to define values for these elements in order to recording information. When you define the Executors you have to tell which browser and operating system this machine has. When you define the Environment you have to associate a DBMS.
The GXtest Manager installation will include standard definitions, in order not to be necessary for the user to create this kind of instances, and just use them when you need them.
Suites and Test Cases
From this menu you can access to the Test cases, datapools, projects and suites defined in the database.
Test Cases y Datapools
From GXtest Manager you can view the available Test Cases. These are the ones who were created in the GXtest Designer and loaded at the data base of the Manager. In the WorkWith Test Cases you can navigate between the different suites that include the Test Case.
Projects
You can view the defined projects and their properties. These projects were created in GXtest Designer. Each of the elements that can be linked (Test Cases, Suites, Datapools, etc..) are associated with a project and have visibility within it (it is not possible to include Test Cases from different projects in a Suite).
Suites
The concept of Suite is proper of GXtest Manager (it doesn't exist in GXtest Designer level), and this is where you create and edit them. As mentioned above, a suite is an ordered set of test cases, which also indicates the number of times to execute each test case.
Tasks
Tasks definition
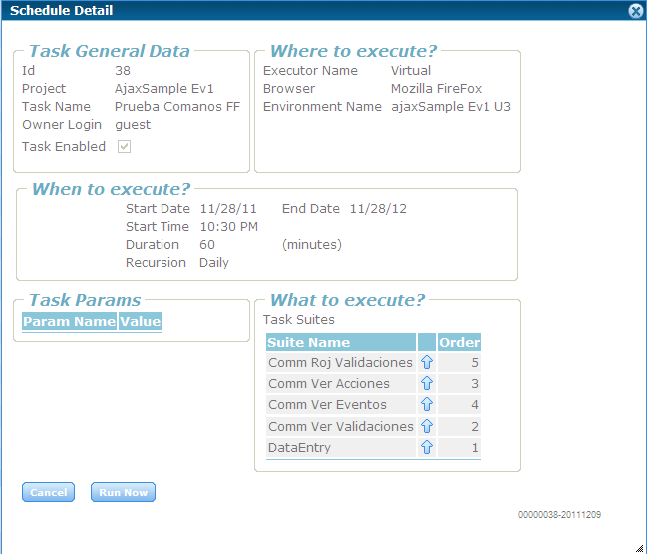
The suites are scheduled to be executed in GXtest Manager. This can be done in the WorkWith Task or on the calendar. When you are creating a Task you have to indicate the Suites to execute and in what order.
If you want to remove a Suite you have to remove the corresponding line of the grid, and you can do this with a right click on the row, and then Delete option. When you do that the row is marked with a cross. After clicking Confirm it will be deleted. The same applies when editing a Task.
By creating the Task we also have to associate it with an Executor where the Task will be executed, and for this we have to create previously the Executor instance in GXtest Manager, indicating IP and Port to connect.
There are three types of loops to define the tasks:
- Once: to run it once.
- Weekly: to run it every week, the indicated days.
- Daily: to run it every day.
For the last two cases it is necessary to indicate start and end date. For any of the three cases it is necessary to indicate a time of execution.
You can optionally indicate the estimated number of minutes that the execution of the test could last. This is requested mainly in order to improve the visualization of the tasks in the calendar, so you can see if they overlap.
The tasks are also associated with a user who is interested in receiving emails with the results after each run.
We also need to indicate the Environment to use. This provides the Task certain information to run related with the execution environment of the application under test.
Import & Export Tasks
At the "Work with Tasks" you can export a task to XML. By clicking on corresponding icon, it creates the XML file containing all information relevant to the task and suites included in it, located in the folder "export" in the installation directory of GXtest Manager.
This task can be imported from generated XML by clicking the icon ![]() . In the next screen, you must enter the path where the file located.
. In the next screen, you must enter the path where the file located.
If you import the task in a project where it already exists, you can choose to overwrite the existing task (including the suites included in it) by setting the combo, or otherwise a new task is created without overwriting the data of the suites there.
Results
You can see the results of the execution of a Task from the Work With Tasks, and from the Task Scheduler by clicking the item that has already been executed and we want to examine.
The results are shown similar to the Designer, indicating "Pass" or "Fail" of the Task in general, and for every Test Case execution, alowing you to examine all the outcomes in the tree for each command executed grouped by "Step".
For every result you can see the action performed, the result, the execution time, and the detail of the error page returned by the application at that time.

