Difference between revisions of "Starting out with GXtest"
(Página nueva: __NOTOC__ category:GXtest Guides Para comenzar vamos crear un proyecto en GXtest y crear el primer caso de prueba simple. == Paso 1: Indicar la/las KB con la cual se va a trabaja...) |
|||
| (12 intermediate revisions by 4 users not shown) | |||
| Line 1: | Line 1: | ||
| + | {{Idiomas|Empezando con GXtest| Starting out with GXtest | GXtest の使用開始}} | ||
__NOTOC__ | __NOTOC__ | ||
[[category:GXtest Guides]] | [[category:GXtest Guides]] | ||
| − | |||
| − | + | In order to begin you need to create a project in GXtest and create the first Test Case. | |
| − | GXtest | + | |
| − | + | ||
| − | + | ||
| − | + | ||
| − | + | ||
| − | + | ||
| − | + | ||
| − | + | ||
| − | + | == Step 1: Choosing the KBs with which you will work == | |
| − | + | GXtest is a functional testing tool for GeneXus. Thusly all of the projects on GXtest have one or more GeneXus KBs associated with them that will be used to build the application. | |
| − | + | ||
| + | In this tutorial you will use the AjaxSample application. The following steps show you how to tell GXtest which KB it is going to work with: | ||
| + | * Download the AjaxSample KB from [[Media:AjaxSampleCompleta.xpz |this]] link | ||
| + | * Open GXtest | ||
| + | * Go to KB > Add KB. | ||
| + | * Choose the AjaxSample KB in the File Path field | ||
| + | * Click OK | ||
| − | + | You have just associated the KB and you can begin to work in GXtest! For more information about how to tell GXtest which KB that you are going to work with see the [[Manual_de_Usuario_de_GXtest_Designer#Importar_la_KB_de_Genexus_en_GXtest | GXtest Designer User’s Manual]]. | |
| − | + | == Step 2: Creating a project == | |
| + | Select Project > New Project. | ||
| − | + | This will open a window where you can enter the project’s properties such as: | |
| − | * | + | * Name, name of the project Type GXAjaxSample90 |
| − | * KBs | + | * KBs associated with the project: Choose the AjaxSample KB from Step 1 |
| − | * | + | * Main URL for the application, Enter http://samples.genexus.com/ajaxsample90 |
| − | == | + | == Step 3: Creating the first Test Case == |
| − | + | Once you create the project, go to the right-hand panel and click Test Cases and Select Record New Test Case. | |
| − | [[ | + | [[Image:record test case.jpg|center]] |
| − | + | This will open the following window: | |
| − | [[ | + | [[Image:ventana record testcase.jpg|center]] |
| − | + | In this window enter the case name (viewClient) and click the red button to begin to record. This will change the window’s state to recording. | |
| + | At the same time it will open Internet Explorer to begin to record the new test case. Once open perform the following steps in the browser window: | ||
| + | * Click on the Work With Clients link. After clicking a window will open asking for the criteria necessary to click on that row. Click OK to tell it that you are clicking because it is the second row. Each time Gxtest performs an action on an element that it encounters in the list, it will ask why that row was choosen. For more information about this topic see the [[Manual_de_Usuario_de_GXtest_Recorder#Criterios_de_selecci.C3.B3n_de_fila_en_las_grillas | GXtest Recorder User's Manual]]. | ||
| + | * Enter Abstracta in the Client Name field and then click Search | ||
| + | * Click the Abstracta link that is in the list of results. Again it will open a window to tell why it selected the the first row, then click OK. | ||
| + | * Select the Abstracta field and click the validations button in Gxtest Recorder. This will bring up a list of validations that can be done while recording a Test Case. Select the AppearText validation which will tell GXtest if the assigned text appears on the page. | ||
| + | * Finally close the browser window. | ||
| + | After recording you can see the modeled Test Case in the main panel of GXtest, it should look like this: | ||
| − | + | [[Image:TestCaseVerCliente.jpg]] | |
| − | + | ||
| − | + | ||
| − | + | ||
| − | + | ||
| − | + | ||
| − | + | == Step 3: Running the Test Case == | |
| − | + | With the Test Case open, click the Run button on the toolbar or Shift+F5: | |
| − | + | [[Image:ejecutar.JPG|center]] | |
| − | + | ||
| − | + | This will cause a browser window to open and it wil begin to run the action you just did. Keep in mind that if the client Abstracta isn’t in the application, it will fail. | |
| − | + | In the following image GXtest shows you the results: | |
| − | + | [[Image: resultadosVerCliente.JPG|center]] | |
| − | |||
| + | You just ran your first Test Case! | ||
| − | + | == See also == | |
| − | + | * [[Creating a Test Case with Data Pools]] | |
| − | == | + | * [[Creating a Test Case with Bifurcation]] |
| − | * [[ | + | * [[Creating an Embedded Test Case]] |
| − | * [[ | + | * [[Creating a Test Case with Variables]] |
| − | * [[ | + | |
| − | * [[ | + | |
Latest revision as of 03:49, 21 February 2014
In order to begin you need to create a project in GXtest and create the first Test Case.
Step 1: Choosing the KBs with which you will work
GXtest is a functional testing tool for GeneXus. Thusly all of the projects on GXtest have one or more GeneXus KBs associated with them that will be used to build the application.
In this tutorial you will use the AjaxSample application. The following steps show you how to tell GXtest which KB it is going to work with:
- Download the AjaxSample KB from this link
- Open GXtest
- Go to KB > Add KB.
- Choose the AjaxSample KB in the File Path field
- Click OK
You have just associated the KB and you can begin to work in GXtest! For more information about how to tell GXtest which KB that you are going to work with see the GXtest Designer User’s Manual.
Step 2: Creating a project
Select Project > New Project.
This will open a window where you can enter the project’s properties such as:
- Name, name of the project Type GXAjaxSample90
- KBs associated with the project: Choose the AjaxSample KB from Step 1
- Main URL for the application, Enter http://samples.genexus.com/ajaxsample90
Step 3: Creating the first Test Case
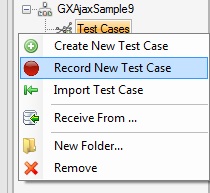
Once you create the project, go to the right-hand panel and click Test Cases and Select Record New Test Case.
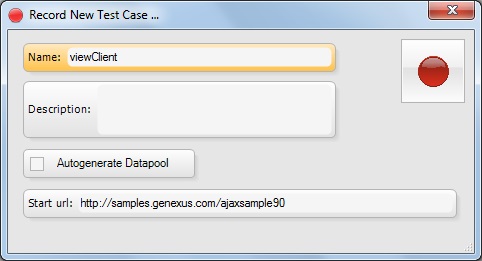
This will open the following window:
In this window enter the case name (viewClient) and click the red button to begin to record. This will change the window’s state to recording. At the same time it will open Internet Explorer to begin to record the new test case. Once open perform the following steps in the browser window:
- Click on the Work With Clients link. After clicking a window will open asking for the criteria necessary to click on that row. Click OK to tell it that you are clicking because it is the second row. Each time Gxtest performs an action on an element that it encounters in the list, it will ask why that row was choosen. For more information about this topic see the GXtest Recorder User's Manual.
- Enter Abstracta in the Client Name field and then click Search
- Click the Abstracta link that is in the list of results. Again it will open a window to tell why it selected the the first row, then click OK.
- Select the Abstracta field and click the validations button in Gxtest Recorder. This will bring up a list of validations that can be done while recording a Test Case. Select the AppearText validation which will tell GXtest if the assigned text appears on the page.
- Finally close the browser window.
After recording you can see the modeled Test Case in the main panel of GXtest, it should look like this:
Step 3: Running the Test Case
With the Test Case open, click the Run button on the toolbar or Shift+F5:
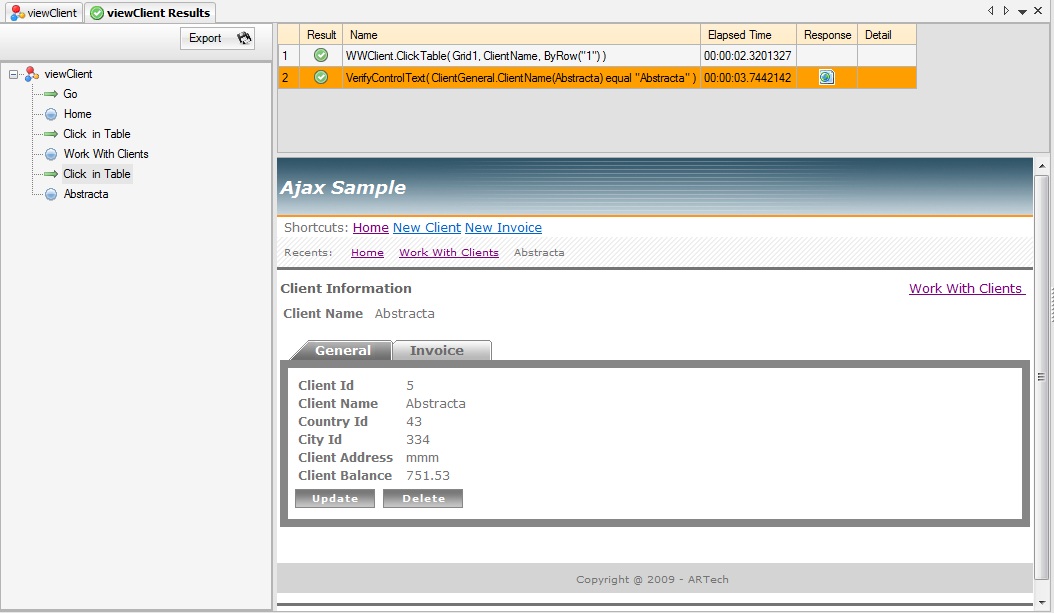
This will cause a browser window to open and it wil begin to run the action you just did. Keep in mind that if the client Abstracta isn’t in the application, it will fail.
In the following image GXtest shows you the results:
You just ran your first Test Case!


