Difference between revisions of "Test Cases"
(→Execute and Record (Play&Record)) |
(→Execute and Record (Play&Record)) |
||
| Line 105: | Line 105: | ||
==== Execute and Record (Play&Record) ==== | ==== Execute and Record (Play&Record) ==== | ||
| − | When we need to extend an existing test case, it is possible to record a new test case, taking as a starting point another test case. For example, if we already have a Login test case, which logs in the user into the web application, and we want to record a new test case that needs the user to be logged in, we do not need to record the Login steps again, we will Play&Record. | + | When we need to extend an existing test case, it is possible to record a new test case, taking as a starting point another test case. For example, if we already have a Login test case, which logs in the user into the web application, and we want to record a new test case that needs the user to be logged in, we do not need to record the Login steps again, we will do a Play&Record. |
[[File:Play Rec NewTC.PNG|center]] | [[File:Play Rec NewTC.PNG|center]] | ||
| Line 114: | Line 114: | ||
The Play&Record option is available in the menu Test Cases -> Recording -> Play&Rec | The Play&Record option is available in the menu Test Cases -> Recording -> Play&Rec | ||
| − | + | First, we need to select a test case to begin with (which will be executed), and then the name for the new test case. | |
==== Execution in FireFox (from version 1.1) ==== | ==== Execution in FireFox (from version 1.1) ==== | ||
Revision as of 14:36, 10 February 2015
Contents |
5. Test Cases
Within each project there are the Test Cases for the application to be tested. Each Test Case is an automated workflow for an application, which can be used to automate regression tests. See also Advice for when to automate.
Test Case Objects
Page
A Page refers to a page of an application and can have a list of actions and a list of validations.
Each page can be associated with a GeneXus object. Test Cases generated with the Recorder will always have the GeneXus object associated and even when you do it manually it is not always necessary to select the object. When there are more than one frame in the same window or when there are more than one window (for example a popup) at the time of running a command, in those cases you must select the object. In addition, while it is running a validation is performed that the page corresponds to the object defined on the page (with the command CheckMainObject).
Edge Line
Each Edge Line represents the transition from one page to the next. Each one has exactly one event. It can also have a list of actions and a list of validations.
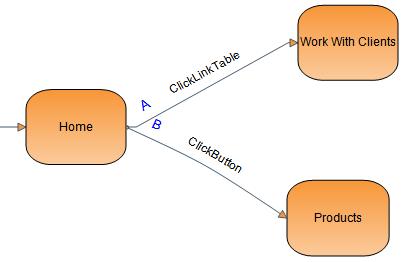
One peculiarity about edge lines is that they have a specific order. Each Edge Line has a letter that indicates the order in case there is more than one Edge Line for a node. Take for example the folloing case:
The first time you go to the Home page you will follow the edge line ClickLinkTable, but when you return to that same page a second time you will follow the edge line ClickButton.
Test Case (Inclusion)
A Test Case object allows you to embed a Test Case within another Test Case (modularize). This allows you to reuse Test Case models. To see and example of an embedded Test Case consult the following article. When embedding an Test Case within another Test Case you can tell GXtest how many times you want to run the embedded Test Case. This value can be a specific number or it can be taken from a Data Pool. When it is taken from a Data Pool you are able to, for example, vary the quantity of items in a invoice depending on the Data Pool.
An important aspect to highlight is that a failure of the execution of one of the iterations of an included test case that is configured to stop the execution when fails, it also will stop the execution of the test case that includes it.
Decision
A decision object allows you to follow two different workflows within an application based on certain conditions. For example, if our Test Case sends a notification to a client if he/she is from Uruguay, but sends nothing if the client is from another country, we can use a Decision to follow one workflow or another depending on where the client is from.
To see an example using Decision see Creating a Test Case with Bifurcation
Creating a Test Case
A Test Case can be created many ways. It can be done manually or by recording it with GXtest Recorder. GXtest Recorder can record a Test Case two ways: on-line and off-line.
Creating a Test Case manually
To create a Test Case manually, select Create New Test Case from the Test Case menu in the project panel.
This creates a Test Case that will remain open in the Models panel. In this new blank page you can begin to model the Test Case. To do so you must draw the workflow to be automated by creating the pages to be visited and connecting them with Edge Lines.
Once the workflow is ready, you must define the commands that will be run for each Edge Line and each Page.
See also list of available commands.
| The Drag and Drop commands allow for easy construction of Test Cases in the Model editor, it is possible to simply drag and drop commands between different components (Edge Lines and Pages). This allows you to move or copy if you hold down the Control key. |
|---|
Creating a Test Case with GXtest Recorder
The difference between On-Line and Off-Line is that the former uses GXtest Recorder together with GXtest Designer so that when you record a Test Case it remains in GXtest Designer ready to use. Whereas using the Off-Line method, GXtest Recorder works separately from GXtest designers and generates a file that later must be imported into GXtext Designer.
On-line Method
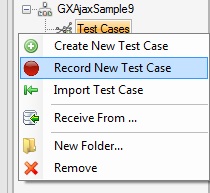
To record a Test Case using the On-Line method select Record New Test Case form the Test Cases menu.
This will open a window that allows you to enter a name for the Test Case and the URL where you want to begin to record. Once you click the Record button a new browser window will open where you can begin to perform the necessary actions. Once you have finished the workflow that you want ot automate simply close the browser window.
Off-line Method
As explained before the Off-Line method allows you to create a Test Case without having to have GXtest Designer installed. This will create a ZIP or XML (since v1.1.4) file that can be imported into GXtest Designer.
Once the ZIP/XML file is created you must create a new Test Case by selecting Import from the Test Cases menu (in the project Panel).
Then choose the ZIP/XML file created previously.
The advantage to this method is that it is not necessary to have GXtest Designer installed in order to automate, you only have to install the extension in Internet Explorer. This also makes it easier for any user to record a workflow for an application if they need technical support or if they are defining acceptance tests etc. For more details see GXtest Recorder User's Manual.
Test Case Validation
Before running a Test Case you should perform a validation. If a Test Case does not meet all the conditions to run it will not be run. Some of the possible causes for a Test Case to not be able to run are that there are no events on a certain Edge Line or that a connection is missing. To validate a Test Case press Shift+F6 or click the following button in GXtest:
Running a Test Case
In GXtest Designer there a several ways of running a Test Case which are described below.
Simple Running of a Test Case
You can run Test Case once by pressing Shift+F5 or clicking the button shown below
This will run the open Test Case one time.
Running a Test Case repeatedly
This allows you to run a Test Case as many times as you decide which allows you, for example, to use Data Pools. To repeatedly run a Test Case press Shift+F7 or click the button shown below:
Note: When you run N times, after each execution GXtest will close all open windows of the browser selected for execution.
Running a Test Case in an opened browser window
This allows you to run a Test Case in a browser window that is already open. To run a Test Case in an open browser press Ctrl+F5 or click the following button:
Note: If you are using Firefox browser (GXtest 1.1 or upper) this functionality can only be used with browser instances opened for GXtest or setted to start with-jssh.
Execute and Record (Play&Record)
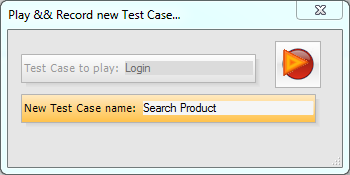
When we need to extend an existing test case, it is possible to record a new test case, taking as a starting point another test case. For example, if we already have a Login test case, which logs in the user into the web application, and we want to record a new test case that needs the user to be logged in, we do not need to record the Login steps again, we will do a Play&Record.
This functionality executes the selected test case (in our case the Login), and once the execution is finished, the Recorder will start to record the user actions over the browser. When the user ends the recording process, the new test case will include the Login test case, and then it will have all the actions that the user recorded.
The Play&Record option is available in the menu Test Cases -> Recording -> Play&Rec First, we need to select a test case to begin with (which will be executed), and then the name for the new test case.
Execution in FireFox (from version 1.1)
To run tests over Firefox you must install the Firefox Extension that can be found over GXtest installation folder : GXtest Designer\Firefox.
"C:\Program Files (x86)\Abstracta\GXtest Designer\Firefox\mozrepl-jssh.xpi" To find a way to install Firefox extensions you may want to take a look at: http://www.wikihow.com/Install-Firefox-Extensions
Para versiones de firefox inferior a 4: 2, 3, 3.5 and 3.6, you should download the plug-in jssh and install it. The plugin can be downloaded at the following links:
Then to tell GXtest Desginer to run using FireFox, change the project properties to the type of browser FireFox.
Note: We recommend disabling automatic updates and "Set as default" dialog in FireFox to avoid failures in the test cases due to this reason.
| Important: while running a test case in any browser, GXtest is going to close automaticaly any popup like "do you want to activate autocomplete" or similar ones. |
|---|
Advice for working with Test Cases
The following lists a couple pieces of advice concerning editing Test Cases.
- Copy and Paste commands with Drag&Drop: in GXtest its possible to move commands from one element to another by simply dragging them and dropping them. You can also copy commands by holding down the Ctrl key while dragging and dropping.
- Changing the order an element’s associated commands: click on the element in the commands panel and drag the commands placing them in the desired order.
Exporting and Importing a Test Case
This article shows the specific steps for importing and exporting a Test Case. If you would like more detailed information about XML generators and exporting Test Cases you can consult this article.
Sending and Recieving Test Cases between databases
As mentioned in the Login / Connections section, in GXtest it is possible to configure several connections. This allows:
- an easy exchange of Test Cases between databases
- exchange of Test Cases between workstations and the GXtest Manager database
| It is important to keep in mind that the names of the projects that contain the Test Cases that are to be transferred ought to be the same. |
|---|
Internally what happens is an export and then an import of the Test Cases into the corresponding databases. To send a Test Case follow these steps:
- Open GXtest using the connection for the original database
- Open the project
- Go to Test Cases > Send & Receive > Send To
- Select the Test Case that you want to send
- Choose the data that you want to send it to
- It will now show the export options (they include Data Pools, recurring Test Cases, etc.) Then click OK
- It will now show the results of the export. Close the results window when finished.
- It will now show the results of the import.
To receive a Test Case follow these steps:
- Open GXtest using the connection for the original database
- Open the project
- Go to Test Cases > Send & Receive > Receive From
- Choose the database that is going to receive the Test Case
- Then choose the Test Case that is going to be received and the options that you want.
- You will then see the results of the export and then the results of the import in the local database.
Back to the GXtest Designer 2.0 User's Manual


