Difference between revisions of "GXtest Designer-GUI"
From GXtest Wiki
(Created page with "{{Idiomas |Interfaz Gráfica GXtest Designer |GXtest Designer Graphical User Interface }} category:GXtest Guides GXtest Designer ユーザーズマニュアル|<- Previ...") |
|||
| Line 2: | Line 2: | ||
|Interfaz Gráfica GXtest Designer | |Interfaz Gráfica GXtest Designer | ||
|GXtest Designer Graphical User Interface | |GXtest Designer Graphical User Interface | ||
| + | |GXtest Designer GUI | ||
}} | }} | ||
[[category:GXtest Guides]] | [[category:GXtest Guides]] | ||
Revision as of 04:44, 24 February 2014
1. GXtest Designer GUI
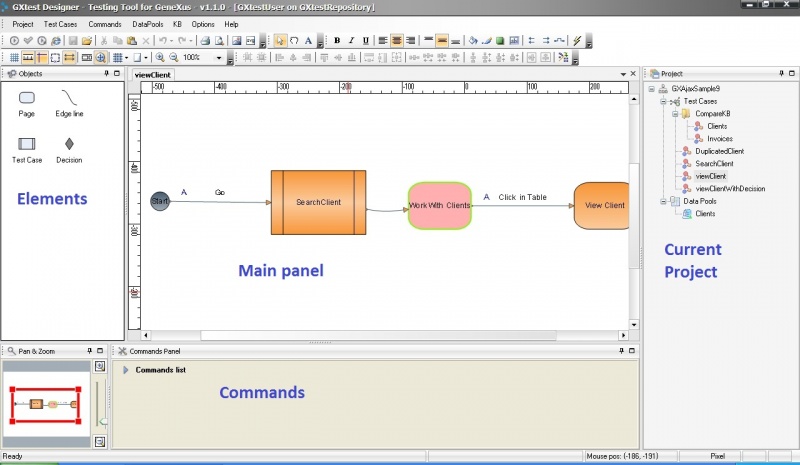
The image below shows the different parts of the GXtest Designer GUI.
- Main Panel: the main panel displays the Test Cases and the results of their execution. It is the program main work area.
- Projects: This panel contains all project elements such as Test Cases and Data Pools.
- Elements: This panel contains all elements of a Test Case. The elements can be dragged to the main panel in order to build Test Cases.
- Commands: This panel displays the commands (actions, validations and events) of each element of a Test Case .
Besides these four main panels, the image also shows a toolbar used to help build Test Cases as well as the Pan & Zoom feature that allows navigation and zooming within the Test Case.
Back to GXtest Designer ユーザーズマニュアル
