Difference between revisions of "Creating a Test Case with Datapools"
(Página nueva: __NOTOC__ category:GXtest Guides Usualmente es necesario variar los datos que utiliza el caso de prueba. Para esto en GXtest se utilizan los DataPools. En esta ocasión veremos ...) |
|||
| (12 intermediate revisions by 5 users not shown) | |||
| Line 1: | Line 1: | ||
| + | {{Idiomas| Crear un Caso de Prueba con Datapools| Creating a Test Case with Datapools| データプールを使用するテストケースの作成}} | ||
__NOTOC__ | __NOTOC__ | ||
[[category:GXtest Guides]] | [[category:GXtest Guides]] | ||
| + | It is usually necessary to vary somewhat the data that a Test Case uses. To do so GXtest uses Data Pools. Here you will learn how to create a Test Case that uses a Data Pool. | ||
| − | + | In this tutorial you will construct a Test case called SeeClientWithDataPool which will use a Data Pool that contains a list of clients. The Test Case will take each of the clients and enter them into a page where they can be viewed. | |
| − | |||
| − | == | + | == Step 1: Creating the Test Case == |
| − | + | ||
| − | + | To begin you will need to follow the steps described in the page [[Starting out with GXtest]], the only difference being that when you create the Test Case you should enter the name as SeeClientWithDataPool. | |
| − | + | ||
| − | + | ||
| − | [[ | + | |
| − | + | == Step 2: Creating the Data Pool == | |
| − | + | After following these steps you should have a Test Case that always shows the client Abstracta. In order to view more than one client you must create the Clients Data Pool. To do so right click on the Data Pools node in the right-hand panel and select Create New Data Pool as shown in the following figure: | |
| − | + | [[Image:addDataPool.jpg|center]] | |
| + | Then enter the name (Clients in this case), a description and click Ok. | ||
| − | [[ | + | [[Image:createNewDataPool.jpg |center]] |
| − | + | A window appears telling you that the Data Pool was successfully created and you choose the number of columns it will have. For this example you will only have one column called Name. | |
| − | + | ||
| − | + | ||
| − | [[ | + | [[Image:createNewDataPool2.jpg |center]] |
| − | + | Click save and it will open so that you can begin to enter data. | |
| − | |||
| − | |||
| − | |||
| − | + | Note: The maximum number of columns that a DataPool can have is 99. | |
| − | + | == Step 3: Entering data into the Data Pool == | |
| + | Here you will enter three pieces of data: Abstracta, Artech and another. | ||
| − | [[ | + | [[Image: DatosDataPool.jpg |center]] |
| − | + | Then click Save to save the data. | |
| + | == Step 4: Associating the Test Case with the Data Pool == | ||
| + | Now that you have the Test Case and the Clients Data Pool ready you need to relate the two concepts by telling the Test Case to use the data from the Data Pool. To do this select the Work With Clients node. If you look in the lower part of the screen there is a panel called Work With Clients commands where you can see the command FillInput that has the value “abstracta”. This value will be replaced by the Data Pool Clients. Right click on the FillInput command and select Edit Command as seen in the image. | ||
| − | [[ | + | [[Image:editCommandMenu.jpg|center]] |
| − | + | A window will then open that allows you to edit the command. In this window are the parameters for the FillInput command. One of these is Value and has “abstracta” entered into it. | |
| − | + | [[Image:editingCommandValue.jpg|center]] | |
| − | + | ||
| − | + | ||
| − | + | In this parameter you need to select that it is a Data Pool and then choose the Clients Data Pool. This figure show how it should look: | |
| − | + | ||
| − | + | ||
| − | + | ||
| − | + | [[Image:editingCommandDataPool.jpg|center]] | |
| − | == | + | Then click OK to save the changes. |
| − | + | ||
| + | The node is now finished. Remember that the edge line that goes from Work With Clients to Abstracta has a validation that controls for the appearance of the name Abstracta on the screen. Therefore you should follow the same procedure for the AppearText Command that is found on the ClickTable Edge Line that goes from Work With Clients to Abstracta. It is a good idea to change the name of the last page from Abstracta to View Client so that it is more clear. Just right click on the page and change the name. | ||
| + | |||
| + | Lastly and most importantly you need to tell GXtest when to move to the next row of the Data Pool which is done by adding the DPNext command to the beginning of the test case. To do so, right click on the Go Edge Line and then click Add Command. Then select Action from the first combobox and DPNext from the second as seen here: | ||
| + | |||
| + | [[Image:addDPNext.jpg|center]] | ||
| + | |||
| + | In this window you specify the command parameter that the Data Pool Clients should follow. The model ought to look like the previous window. | ||
| + | |||
| + | The Test Case parameters are now ready and you just need to run it. | ||
| + | |||
| + | == Step 5: Running the Test Case == | ||
| + | To run the Test Case click the Run N button or Shift+F7. | ||
[[Image:BotonEjecutarN.jpg|center]] | [[Image:BotonEjecutarN.jpg|center]] | ||
| − | + | Then tell it to run 3 times | |
| − | [[ | + | [[Image:ChooseNWindow.jpg|center]] |
| − | + | This will open a new browser and it will be run with Abstracta, then again with Artech and once again with Artech ss. | |
| − | == | + | == See also == |
| − | * [[ | + | * [[Creating a Test Case with Bifurcation]] |
| − | * [[ | + | * [[Creating an Embedded Test Case]] |
| − | * [[ | + | * [[Creating a Test Case with Variables]] |
Latest revision as of 20:44, 20 February 2014
It is usually necessary to vary somewhat the data that a Test Case uses. To do so GXtest uses Data Pools. Here you will learn how to create a Test Case that uses a Data Pool.
In this tutorial you will construct a Test case called SeeClientWithDataPool which will use a Data Pool that contains a list of clients. The Test Case will take each of the clients and enter them into a page where they can be viewed.
Step 1: Creating the Test Case
To begin you will need to follow the steps described in the page Starting out with GXtest, the only difference being that when you create the Test Case you should enter the name as SeeClientWithDataPool.
Step 2: Creating the Data Pool
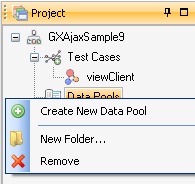
After following these steps you should have a Test Case that always shows the client Abstracta. In order to view more than one client you must create the Clients Data Pool. To do so right click on the Data Pools node in the right-hand panel and select Create New Data Pool as shown in the following figure:
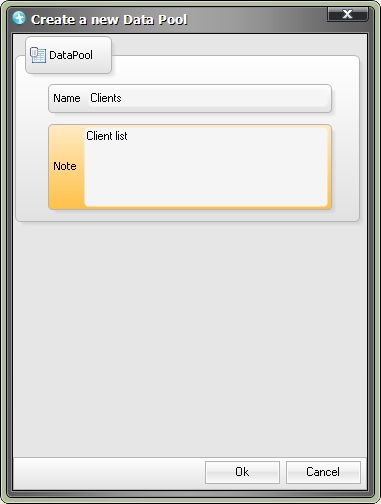
Then enter the name (Clients in this case), a description and click Ok.
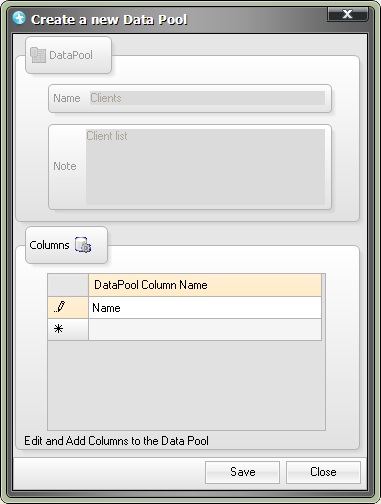
A window appears telling you that the Data Pool was successfully created and you choose the number of columns it will have. For this example you will only have one column called Name.
Click save and it will open so that you can begin to enter data.
Note: The maximum number of columns that a DataPool can have is 99.
Step 3: Entering data into the Data Pool
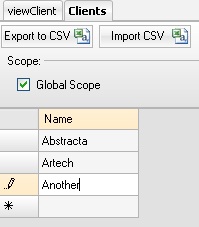
Here you will enter three pieces of data: Abstracta, Artech and another.
Then click Save to save the data.
Step 4: Associating the Test Case with the Data Pool
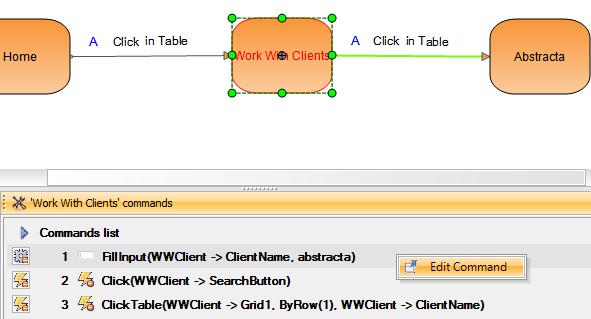
Now that you have the Test Case and the Clients Data Pool ready you need to relate the two concepts by telling the Test Case to use the data from the Data Pool. To do this select the Work With Clients node. If you look in the lower part of the screen there is a panel called Work With Clients commands where you can see the command FillInput that has the value “abstracta”. This value will be replaced by the Data Pool Clients. Right click on the FillInput command and select Edit Command as seen in the image.
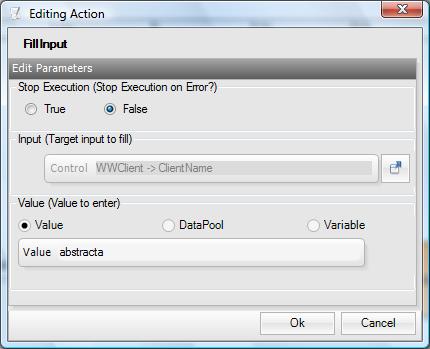
A window will then open that allows you to edit the command. In this window are the parameters for the FillInput command. One of these is Value and has “abstracta” entered into it.
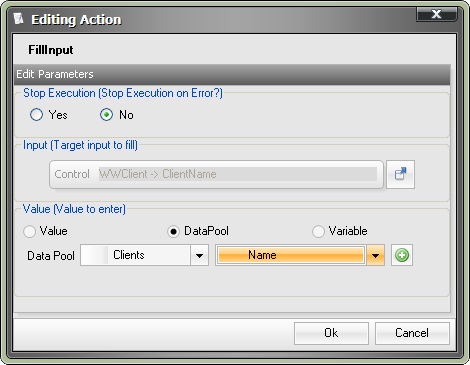
In this parameter you need to select that it is a Data Pool and then choose the Clients Data Pool. This figure show how it should look:
Then click OK to save the changes.
The node is now finished. Remember that the edge line that goes from Work With Clients to Abstracta has a validation that controls for the appearance of the name Abstracta on the screen. Therefore you should follow the same procedure for the AppearText Command that is found on the ClickTable Edge Line that goes from Work With Clients to Abstracta. It is a good idea to change the name of the last page from Abstracta to View Client so that it is more clear. Just right click on the page and change the name.
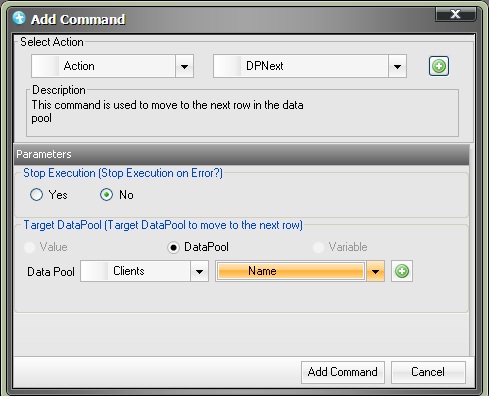
Lastly and most importantly you need to tell GXtest when to move to the next row of the Data Pool which is done by adding the DPNext command to the beginning of the test case. To do so, right click on the Go Edge Line and then click Add Command. Then select Action from the first combobox and DPNext from the second as seen here:
In this window you specify the command parameter that the Data Pool Clients should follow. The model ought to look like the previous window.
The Test Case parameters are now ready and you just need to run it.
Step 5: Running the Test Case
To run the Test Case click the Run N button or Shift+F7.
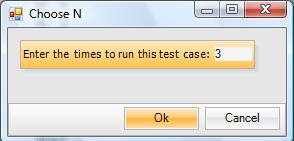
Then tell it to run 3 times
This will open a new browser and it will be run with Abstracta, then again with Artech and once again with Artech ss.
